Showing posts with label Accuquilt GO. Show all posts

Monday, 22 October 2012

Book Tour - The Big Little Book of Fabric Die Cutting Tips

Welcome to my leg of the book tour for Ebony Love's much anticipated debut book "The Big Little Book of Fabric Die Cutting Tips" :)

Before we go any further I'd just like to say that unlike all of the amazing book tour stops before me, I'm not a professional/expert die cutter or quilter! I'm just your average 30-something stay at home mum who fell into die cutting rather like I fell into quilting - straight in the deep end and working it out as I go along! But the fact that *I* am not a professional is really unimportant, because as you'll discover (if you don't already know), Ebony is THE "go to" girl in the fabric die cutting world.

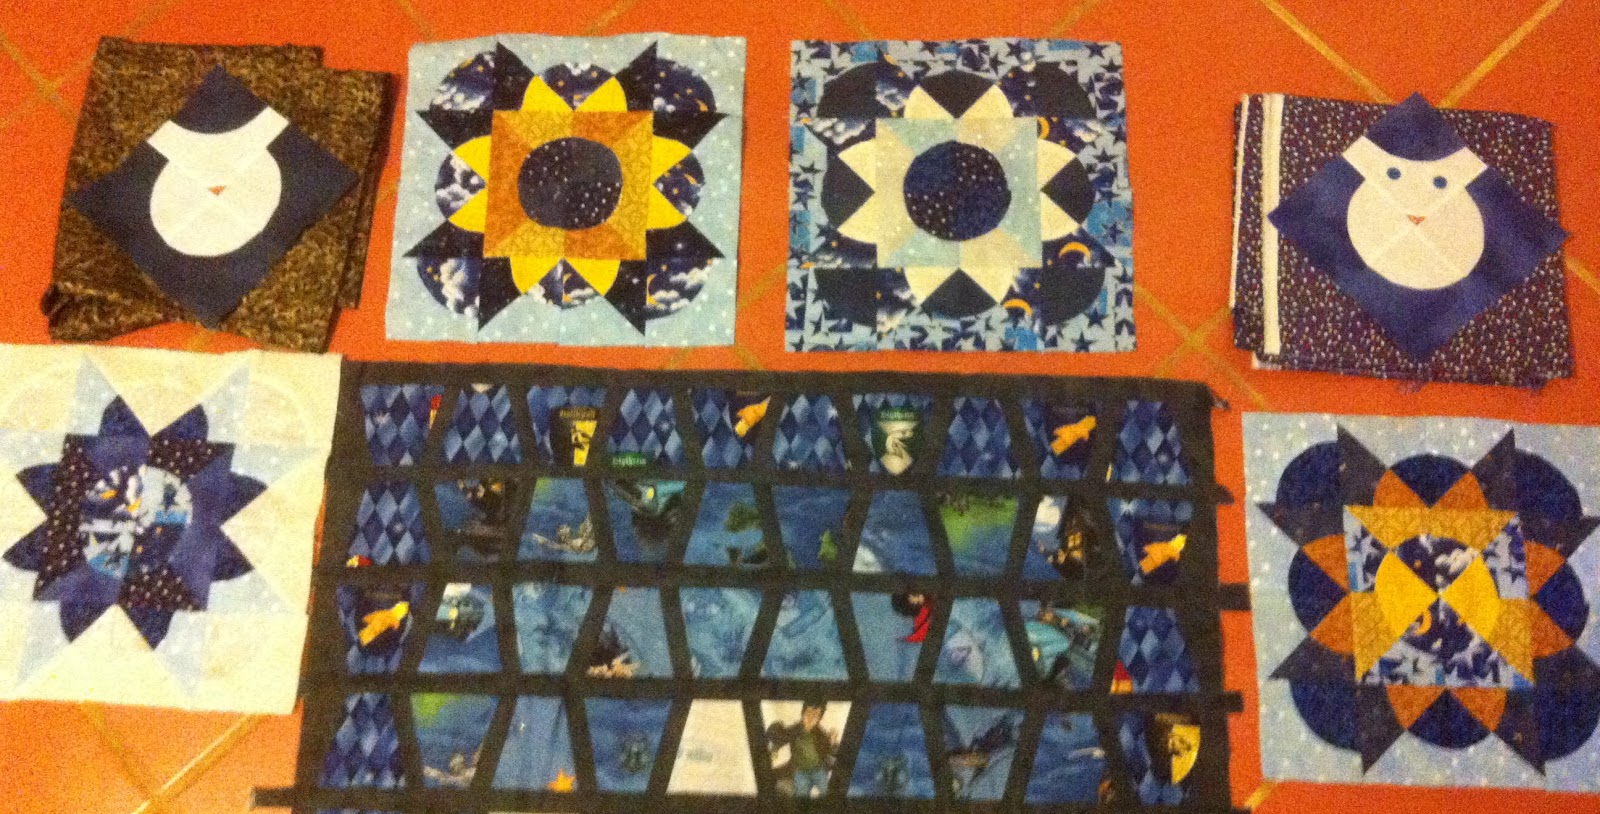
I wish that there had been a book like Ebony's when I was making my first foray into die cutting 12 months ago. My son "outgrew" his baby quilt, so I decided that it was time to make him a new one. I found some Harry Potter fabric squares on ebay (he's only a little obsessed!) and then went on to think about how I was going to put it all together. In Australian Patchwork & Quilting magazine I'd seen ads for the Accuquilt GO! cutter, which ultimately led me to research it a little online and decide that I needed the GO! (as opposed to the Baby) and the Drunkard's Path die. I'd seen this cool idea for a Split Drunkard's Path star block online and I thought it would be a perfect way to use my Harry Potter fabric. I did some price researching, and while it was cheaper in the US, the shipping to Australia would cripple me, so I sucked up the price difference and found a place over here that had a pretty good price, and as it happened, a sale on dies! Hmm.. surely I needed more than just the Drunkard's Path? I managed to convince my husband to order me the Double Wedding Ring, the Rose of Sharon, the Tumbler and the 2.5" strip die (the strip die was an after thought, but it was $58 down from $85 for the GO Baby compatible one, so I couldn't go past it!).. and then I snuck in the Sunbonnet Sue die when he wasn't looking.. Turned out that ordering the Tumbler die was the best thing I did for that quilt, because the fabric squares were too small to use with the Drunkard's Path die. But I found a way to make those stars anyway!


And that 2.5" strip die I bought just because it was on sale? Best. Die. Purchase. Ever. I use it with EVERY quilt I make (sometimes for sashing, ALWAYS for binding!). Ebony outlines a whole range of other things you can do with the strip dies, including cross cutting the strips to make diamonds or squares. I also picked up a few tips on continuous borders by cutting length of fabric (LOF) instead of width of fabric (WOF). Other sized strip dies are definitely on my "to get" list!

If I'd had Ebony's book before buying my GO!, I think that the section on choosing which die cutter to suit you would have been invaluable. I love my GO! but there are times when I wish I had something larger, like the Big Shot Pro - especially because it has the flexibility of using other brand dies (including the Accuquilt ones) which my GO! does not. I love Ebony's clear, concise comparisons of the features of each cutter, the number of dies available, the die compatibility of other brands etc. Having it all right there in an easy to read format makes it much easier to make an informed decision.

Recently I've been pondering the purchase of a smaller machine because while my GO! *is* portable, it's quite heavy and cumbersome when I'm also trying to carry bags filled with fabric and my sewing machine when I go to guild meetings etc.  I'd naturally considered the Baby GO! because it will fit all my dies (except the DWR), but after seeing the Sizzix Big Shot at the Craft Fair a few months ago I've been in a quandary. I loved some of the dies that Sizzix offered (like the multiple same size hexie dies) but I wasn't sure that I wanted to invest in a new system, especially given that the Big Shot will only work with my 5x10" dies (which rules out almost all the dies I currently own).

After reading Ebony's comparison section, I'm seriously considering the Big Shot. After all, I'll still have my GO! so it's not like I won't be able to use my 6"+ Accuquilt dies, and I could just take my GO! on those occasions when I need to use the dies that are too big for the Big Shot. Additionally I'd also have the opportunity to purchase Sizzix and other brand dies that catch my fancy.

Don't think that just because you've already got a fabric cutter that you won't need this book - I picked up so many tips and ideas when I read through it. Some of them were so simple that you'd think they were obvious, and yet it had never occurred to me that I might be able or need to do some of those things. I'd never thought about checking my dies for accurate cutting by using paper to do the first cut, or even filing those paper pieces for future reference (eg using applique cuts to audition placement on blocks etc).


There is something in The Big Little Book of Fabric Die Cutting Tips for everyone. If you don't have a die cutter but are thinking of purchasing one, you should read Ebony's book before you make any decisions.. and if you already have a die cutting machine and want to learn how to get the most out of your die cutting experience then you won't be disappointed! I can't wait to get my hard copy so that I can make a few notes in the convenient sections Ebony has peppered throughout the book - perfect for all the extra tips I've been picking up over the course of the book tour!

Don't forget to check out all the stops along the way - there are even a few chances to win yourself a copy of the book! If you'd like to read an excerpt, Ebony has one available here :)


Tuesday, 16 October 2012

September Craftsy BOM blocks

I was quite looking forward to the September Craftsy BOM blocks - curved piecing using the Drunkard's Path blocks! Naturally my first thought was whether I could adapt the pattern to use my Accuquilt GO! cutter and my Drunkard's Path die. Why yesindeedy.. with a little trimming.. and while trimming can be time consuming and tiresome, it *does* give better accuracy, so it all fell into place as if Amy Gibson had designed these blocks just so I could give Flo (my GO!) a workout!

Phillipa and Belinda also used Flo to cut their blocks, and we all pieced them using my Curvemaster foot. I *really* love that Curvemaster foot! No pinning, and magically accurate blocks. If you don't have one, and you want to sew something with a lot of curves, I'd highly recommend adding it to your toolkit.

September Block #1 - The Chain Block
I decided that I just wasn't feeling the love when it came to the Cleopatra's Puzzle block, so I took inspiration from one of the other ladies in the QCA Craftsy BOM facebook group. Sheila had put her block together with the print fabric in the centre, forming the pinwheel.. which I liked..
 ..until I laid it out in reverse, with the white fabric in the centre and the print fabric as the "background". I really loved how this block turned out, and once my plate is clear I'd love to play around in EQ7 with it as a whole quilt layout.. I think it would look awesome. But that's WAY down on my list of things to do atm!
I can't believe there are only two more blocks to complete and then it will be time to assemble to quilt top! The year has just flown by!

Monday, 11 June 2012

The Harry Potter Quilt, complete!


It just occurred to me that I never posted about the Harry Potter quilt once it was completed! I managed to get it done in time to present it to Bean on his birthday - yay! He was very pleased with it, and it has been on his bed ever since. He then promptly requested a Pirates of the Caribbean quilt for his next quilt, to which I replied that his next quilt is quite a way down my list!

Using painter's tape to baste the backing fabric to the floor  

And some more painter's tape to secure the batting

Quilt top in place, and ready to pin

Pinning, pinning and more pinning.
 I must have spent 2 hours pin basting this quilt.. I pinned every tumbler block, which was like 132 pins.. and then there were the Split Drunkard's Path Stars and the owls etc. My knees and my back were killing me by the end of it, I was walking like a little old lady! Even my fingers and palms took a beating. Next time it will be spray basting for a project this large!

On the upside, none of the pins were "in my way" when it came to the quilting, and it was quite therapeutic when I got to remove them finally!

Centre section basted and ready to go!

Gosh I love how the stars turned out - they're seriously my favourite part of the quilt!

Simple ditch quilting
 I decided that the quilt really wouldn't suit an all over quilting design due to all the different elements, and the good old "stitch in the ditch" was really the perfect option. I bought two different threads, a mid-dark grey for the back of the quilt and a mid grey-blue for the quilt top. They ended up blending so perfectly that you almost can't see the thread.. and the back of the quilt looks amazing because the quilting really makes the design stand out even though the backing fabric is charcoal grey.

I did some free motion quilting at the top and the bottom of the quilt where the blue fabric sections are - I attempted a spirally wave type of design that turned out better than I expected (but certainly not pro by any means!). I think it adds some movement in a subtle kind of way.

On the bed, ready to go!
I know I've said that if I'd had any idea how much time, effort and thought/planning/quilt math would be needed to complete this quilt I probably would have sucked it up and paid $90 for a Harry Potter quilt panel on eBay.... but really, it turned out so much better than I could have hoped for and I'm really rather pleased with myself. It's definitely the biggest, most ambitious and intricate project I have ever taken on (it really makes their "baby quilts" look tiny and insignificant) and it's nice to know that I can pull off something more than a lap sized quilt.

Now I just need to do some work on that king sized quilt I'm going to make for the husband and myself! (Don't hold your breath for that to be finished any time soon - I've only made one Swoon block so far!) And before I do that I have some BOM blocks to catch up on and a couple of swap projects to complete.. it's kind of nice to not have a major project with a deadline looming!

Incase anyone is interested to note, almost all the pieces of this quilt were cut using my Accuquilt GO! fabric cutter, using the 3.5" Drunkard's Path, the small Tumbler and the 2.5" Strip Dies. That includes all the sashing and the binding (LOOOOVE my 2.5" strip die!).

Sunday, 29 April 2012

May Bee Blocks

 I know it's not even May yet, but I've totally completed my May block already! This month it was Phillipa's turn, so I helped her road test her design. She has blogged the instructions over at our blog Needles in the Haystack.


We pre cut all the heart shapes using Flo the Accuquilt GO! and used SewCalGal's "mock needle turn applique" technique.
My attempt at thread painting!
I think the block turned out beautifully, and I'd definitely use the mock needle turn applique technique again!

Thursday, 5 April 2012

Harry Potter quilt update

It's been ages since I've written an update on the Harry Potter quilt, and that's mostly because once I realised I wasn't going to have it ready before Christmas and it would become Bean's birthday present I just sat on it... because I had *time*... like a whole 6 months... except time has gotten away from me and now I have just less than a month. I can't disappoint my son by not having it ready in time for his birthday - he's been asking when he's getting his Harry Potter quilt and it makes me feel so guilty!

But over the last 2 weeks I've been on a roll - I completed the rest of the Split Drunkard's Path Star blocks, and laid it out so I could get an idea of how all my pieces looked together:
All my blocks, roughly placed.
 Next step: Making the owl blocks the same size as the star blocks. This shouldn't be too hard, right? It's just a case of cutting some triangles and sewing them on...
Auditioning 2 different fabrics as potential backgrounds for my owl blocks.
 I went with some blue "feedsack" (repro, of course!) fabric I'd bought at Spotlight, drew a scale drawing of my block and the "finished size" block and then used my ruler to work out how big my HSTs needed to be in order to make my block the right size. Luckily for me, it went together pretty smoothly. (Clearly my quilt math was ok!)
My larger owl block (unpressed)

Blocks laid out again with the larger owls
The next day I worked out how I was going to sash the stars to make them fit and have now turned them into strips of stars (but I forgot to take a photo) and I went and purchased a complimentary fabric that will go at the top and the bottom of the quilt top to make it longer. I think the width will be fine once it's all sashed and put together properly.

I haven't had a chance to touch it since last Thursday/Friday though as my husband and I have spent most of our spare time playing with Daisy, my new embroidery machine. (He is playing with another design he's digitized as we speak! I am sure he's getting WAY more out of this toy than I am! Oh, and my sister-in-law had her baby, so we've been visiting my new nephew!) Hopefully I'll get a chance to go to Phillipa's in the morning for our regular Thursday sewing morning and work on it some more then. Only 25 more days until it needs to be finished!

Tuesday, 20 March 2012

Why hello, Mr Postman!

I got 3 exciting packages in the mail today... the first one came all the way from Ann Arbor, MI.. from the lovely ladies (Polly) Minick & (Laurie) Simpson! I won a charm pack of Prairie Paisley II in the recent Vintage Modern blog hop run by The Fat Quarter Shop (but more about that in a minute!) - which will match my Prairie Paisley II layer cake perfectly!

 The next package was my new Heart die for my Accuquilt GO! fabric cutter.. this came from Cutting Art, where I purchased my GO! They have excellent customer service and great prices (similar prices to the US - much less mark up than other Australian retailers!).. Phillipa is planning something with this die for the QCA Bee girls when it's her turn to be Bee Leader in May.


And my last package came from The Fat Quarter Shop. It's a Fat Eight bundle of Twirl by Me & My Sister.. also from the Vintage Modern blog hop. Sadly they'd run out of the layer cakes that were supposed to be the prize, so I had to settle for the F8 bundle - what a shame! And speaking of great customer service, The Fat Quarter Shop is amazing! Aside from upgrading my prize, they also went above and beyond with a recent order that I placed regarding how much they could stuff into a flat rate envelope.. clearly they are just as invested in their international customers as they are in their local customers ♥

So thank you, Mr Postman.. you've made my day!

Tuesday, 21 February 2012

And the winner is....

Before I announce the winner I'd just like to take a moment to thank everyone who participated in the Accuquilt "Go Ahead and Show a Little Love" blog hop. You girls were amazing - all the projects were wonderful and I just can't wait to try out some of your ideas!

I'd also like to thank everyone who stopped by to read my blog hop post, especially those who took the time to enter the giveaway. I loved reading about all the ways you did (or didn't) spend your Valentine's Day.

And now to the moment you've all been waiting for! Mr Random Number has made his decision...


Which means that "Congratulations!" go to:


Congratulations Lee Ann! I will be emailing you shortly :)

Thanks again everyone - you made my giveaway so much fun that I might just have to do another one some time soon!

Saturday, 18 February 2012

Tutorial: Valentine's Mug Rug (Go! Ahead and Show a Little Love blog hop)


Let me start by saying that I love "Flo", my Accuquilt GO! Before I had my Go! I had never ventured much past squares and rectangles in my quilts.. but now I've progressed to curves (LOVE my Drunkard's Path die!), tumbler blocks and even little Sunbonnet Sue!

For my Go! Ahead and Show a Little Love blog hop project I decided to use dies that I'd consider basic essentials - the Value die (which comes with the Go! - and is available for separate purchase with the Go! Baby) and the 2.5" strip die.

If you don't have an Accuquilt cutter, you can still make this project using your acrylic rulers & rotary cutter. :)

You will need:
Main Fabric 
Background Fabric
Border Fabric
Backing Fabric
Binding Fabric (this can be the same as the Main Fabric)
Batting

(Fabric estimates will depend on how many mug rugs you are planning to make... a fat quarter of each fabric should be enough to make 3-4 mug rugs.)

Step 1: Using the Value die cut-
  • 8x 2.5" HSTs (Half Square Triangles) of the Main fabric
  • 8x 2.5" HSTs of the Background fabric
  • 2x 2.5" Squares of the Main fabric
  • 2x 2.5" Squares of the Background fabric

Lay out your pieces, making sure directional prints are going the right way!


 Step 2: Pair the HSTs so that you have one Main Fabric and one Background Fabric per pair. Open out and press seams according to personal preference.


 Step 3: Join "square" blocks as shown below. You should end up with 6x rectangular blocks. Press seams.


 Step 4: Sew rectangle blocks together to form two columns, pressing seams as you go (quick, we need to mend that broken heart!)


Step 5: Join the two halves of your heart together!


 Step 6: Using the 2.5" Strip Die cut a WOF (Width of Fabric) strip of your Border Fabric. I have marked my die so that I can then place my 2.5" strip down the centre of my die and turn it into a 1.25" strip, but you can also do this using your WOF acrylic ruler and rotary cutter. Sew a strip to each end of the heart panel (approx 6.5" long, but I prefer to cut a little longer and then trim back). Press and then sew a strip to the top and the bottom of the heart panel (approx 10"). Press.


 Step 7: Cut your Backing Fabric and Batting slightly larger than your mug rug flimsy. Baste, and then quilt as desired. I decided to ditch stitch around the heart shape and then have a stab at some FMQ using SewCalGal's January FMQ Challenge design.

My attempt at FMQ!
 Step 8: Using the 2.5" Strip Die cut a WOF strip of your Binding Fabric. If you are using fat quarters you will need 2-3 strips. Join your strips using a 45 degree angle and press the seams open to reduce bulk. Press in half lengthwise, wrong sides together.


The bulk of the seam is spread between the two points.


 Step 9: Sew binding to the back of your mug rug using 1/4" seam. (There are lots of great binding tutorials floating around, Luv in the Mommy Hood has done a "round up" of a few different types)


Step 10: Press the binding forward, fold over to the front and pin so that the edge of the binding just covers the stitch line. I forget which blog I originally saw it on, but someone suggested using a decorative stitch to secure the binding to the front - it's fairly forgiving when compared to ditch stitching, and adds an extra level of interest to your design. I used a feather stitch as my machine is rather limited in it's stitch choices, but I liked the effect it gave.

And there you have it!

Your completed mug rug, ready to give to your sweetheart!


Mug rugs for the whole family!
Seriously though, I took one of these to school when I picked the kids up on Valentine's Day and when Blossom came out of her Kindy class I held it up and said "This is how much I love you!". She squealed with delight and asked if it was for her (which it wasn't, really.. I'd just gifted it to her Daddy!) so I said she could have one of my other ones.. She promptly showed it to anyone and everyone who would look.. the other Mums, her teachers, classmates, even the crossing guard! I did the same thing a few minutes later when I picked up Bean to a very similar response (less with the squealing and showing everyone, more with the heart clutching delight) - so I had to run home and finish off the binding on the other two mug rugs so they could have their own! They even slept with them.

I also made a matching table runner! I can post a tutorial for that if anyone's interested.

So what about this giveaway, you ask? Well.. for being so patient and bearing with me during my tutorial I am giving one lucky reader the chance to win a mug rug kit of your own! I will include pre-cut pieces to make the top including borders and the binding, all you will need is your batting and backing. Wait.. what good is one mug rug on Valentine's Day? Better make it enough for two <3

How do you win? Here's are ways you can win (you need to be a follower):

1. Tell me how you spent Valentine's Day. If you don't celebrate Valentine's Day, that's ok - tell me what you did instead! Or just leave a comment.
2. Follow me (and/or tweet about the giveaway) on Twitter.
3. Follow me on Pinterest.
4. Share this post on Facebook and/or blog it.

The winner will be selected using a Random Number Generator on Tuesday 21 February (10:00am Australian Western Standard Time) with the winner notified by email (and on this blog). Please make sure you're able to be contacted by providing an email address or making sure you're not a no-reply blogger :) International entries accepted.

Go! Ahead and Show a Little Love Final Day!

So, it's the final day here at the Accuquilt Go! Ahead and Show a Little Love blog hop! I'm sharing today with Stacey (Driving Miss Stacey) and Paulette (Sweet P Quilting and Creations) so don't forget to check them out and show them a little love too :) Check out my next post for my project and a little GIVEAWAY! Woo!


In case you've missed any of the other blogs in the hop, make sure you take the time to visit them all - there are some awesome projects, not to mention a few giveaways along the way!


February 13th
Ariane (Ariane's Crafts

February 14th

February 15th
Lisa Marie (Scraps of Life)

February 16th

February 17th
Sharon (Crazee Corners

February 18th

Go! Ahead and Show a Little Love blog hop - Day 5!


Today you have the lovely Sharon from Craizee Corners and Snoodles from Lily Pad Quilting demonstrating their skill with their Accuquilt cutters :)

And then tomorrow.... it's my turn! Only one more sleep, people!

Don't forget to come back to check out those coming up (or that you might have missed!):

February 13
Marjorie from Marjorie Busby Quilts
Ariane from Ariane's Crafts

February 14
Connie from Quilting by the River
Linda from Living 4 Quilting

February 15
Lisa Marie from Scraps of Life
Marilyn from North Hill Quilter

February 16 (yesterday)
Alicia from Heirloom Quilting
Marjorie from Marjorie's Busy Corner

February 18 (tomorrow)
Stacey from Driving Miss Stacey
Tracey from The Peony Teacup (that's me!)

Thursday, 16 February 2012

Go! Ahead and Show a Little Love blog hop - Day 4!


Are you enjoying the "Go! Ahead and Show a Little Love" Accuquilt blog hop so far? It's half way through now.. just a few more days to go and then it will be my turn!

But before we get to that, you have the lovely Alicia from Heirloom Quilting and Marjorie from Marjorie's Busy Corner showing you their projects today :)

Then come back to check out those coming up (or that you might have missed!):

February 13
Marjorie from Marjorie Busby Quilts
Ariane from Ariane's Crafts

February 14 
Connie from Quilting by the River
Linda from Living 4 Quilting

February 15 (yesterday)
Lisa Marie from Scraps of Life
Marilyn from North Hill Quilter

February 17 (tomorrow)
Sharon from Craizee Corners
Snoodles from Lily Pad Quilting

February 18
Stacey from Driving Miss Stacey
Tracey from The Peony Teacup (that's me!)

Go! Ahead and Show a Little Love blog hop - Day 3!


Today's line up for the "Go! Ahead and Show a Little Love" Accuquilt blog hop features Lisa Marie from Scraps of Life and  Marilyn from North Hill Quilter - don't forget to go and see what they've got in store :)


Then come back to check out those coming up (or that you might have missed!):

February 13
Marjorie from Marjorie Busby Quilts
Ariane from Ariane's Crafts

February 14 (yesterday)
Connie from Quilting by the River 
Linda from Living 4 Quilting


February 16 (tomorrow)
Alicia from Heirloom Quilting
Marjorie from Marjorie's Busy Corner

February 17
Sharon from Craizee Corners
Snoodles from Lily Pad Quilting

February 18
Stacey from Driving Miss Stacey
Tracey from The Peony Teacup (that's me!)

Tuesday, 14 February 2012

Go! Ahead and Show a Little Love blog hop - Day 2!


The "Go! Ahead and Show a Little Love" blog hop started yesterday with Marjorie from Marjorie Busby Quilts and Ariane from Ariane's Crafts - if you didn't get a chance yet, make sure you drop in and check their blogs out!


Today is Valentine's Day! Do you have plans? 
You do now! Go and visit Connie from Quilting by the River and Linda from Living 4 Quilting for today's Accuquilt themed love fun!


Then come back tomorrow (and the day after, and the day after etc) to check out:

February 15
Lisa Marie from Scraps of Life
Marilyn from North Hill Quilter

February 16
Alicia from Heirloom Quilting
Marjorie from Marjorie's Busy Corner

February 17
Sharon from Craizee Corners
Snoodles from Lily Pad Quilting

February 18
Stacey from Driving Miss Stacey
Tracey from The Peony Teacup (that's me!)


Monday, 13 February 2012

Go! Ahead and Show a Little Love blog hop - Day 1!


The "Go! Ahead and Show a Little Love" blog hop starts today.. go and check out Marjorie from Marjorie Busby Quilts and Ariane from Ariane's Crafts to see what kinds of red and white Valentine's goodies they have come up with.. and that's just the beginning :) 

Stay tuned for:


February 14 (Happy Valentine's Day!)
Connie from Quilting by the River
Linda from Living 4 Quilting

February 15
Lisa Marie from Scraps of Life
Marilyn from North Hill Quilter

February 16
Alicia from Heirloom Quilting
Marjorie from Marjorie's Busy Corner

February 17
Sharon from Craizee Corners
Snoodles from Lily Pad Quilting

February 18
Stacey from Driving Miss Stacey
Tracey from The Peony Teacup (that's me!)


Sunday, 12 February 2012

Go! Ahead and Show a Little Love Blog Hop - Starts tomorrow!


Love is in the Air! Can you feel it? There has definitely been a whole lot of quilty love floating around blog land in the last couple of weeks.. Valentine's Day blog hops are everywhere!


As mentioned, some of the girls from SewCalGal's Quilter's With Modern Tools list have put together an Accuquilt themed blog hop that starts tomorrow! The line up is as follows:


February 13 (tomorrow!)
Marjorie from Marjorie Busby Quilts
Ariane from Ariane's Crafts

February 14 (Happy Valentine's Day!)
Connie from Quilting by the River
Linda from Living 4 Quilting

February 15
Lisa Marie from Scraps of Life
Marilyn from North Hill Quilter

February 16
Alicia from Heirloom Quilting
Marjorie from Marjorie's Busy Corner

February 17
Sharon from Craizee Corners
Snoodles from Lily Pad Quilting

February 18
Stacey from Driving Miss Stacey
Tracey from The Peony Teacup (that's me!)

See you soon!
Related Posts Plugin for WordPress, Blogger...

ShareThis

Online Quilting Class