Showing posts with label Flo the GO. Show all posts

Saturday, 18 February 2012

Tutorial: Valentine's Mug Rug (Go! Ahead and Show a Little Love blog hop)


Let me start by saying that I love "Flo", my Accuquilt GO! Before I had my Go! I had never ventured much past squares and rectangles in my quilts.. but now I've progressed to curves (LOVE my Drunkard's Path die!), tumbler blocks and even little Sunbonnet Sue!

For my Go! Ahead and Show a Little Love blog hop project I decided to use dies that I'd consider basic essentials - the Value die (which comes with the Go! - and is available for separate purchase with the Go! Baby) and the 2.5" strip die.

If you don't have an Accuquilt cutter, you can still make this project using your acrylic rulers & rotary cutter. :)

You will need:
Main Fabric 
Background Fabric
Border Fabric
Backing Fabric
Binding Fabric (this can be the same as the Main Fabric)
Batting

(Fabric estimates will depend on how many mug rugs you are planning to make... a fat quarter of each fabric should be enough to make 3-4 mug rugs.)

Step 1: Using the Value die cut-
  • 8x 2.5" HSTs (Half Square Triangles) of the Main fabric
  • 8x 2.5" HSTs of the Background fabric
  • 2x 2.5" Squares of the Main fabric
  • 2x 2.5" Squares of the Background fabric

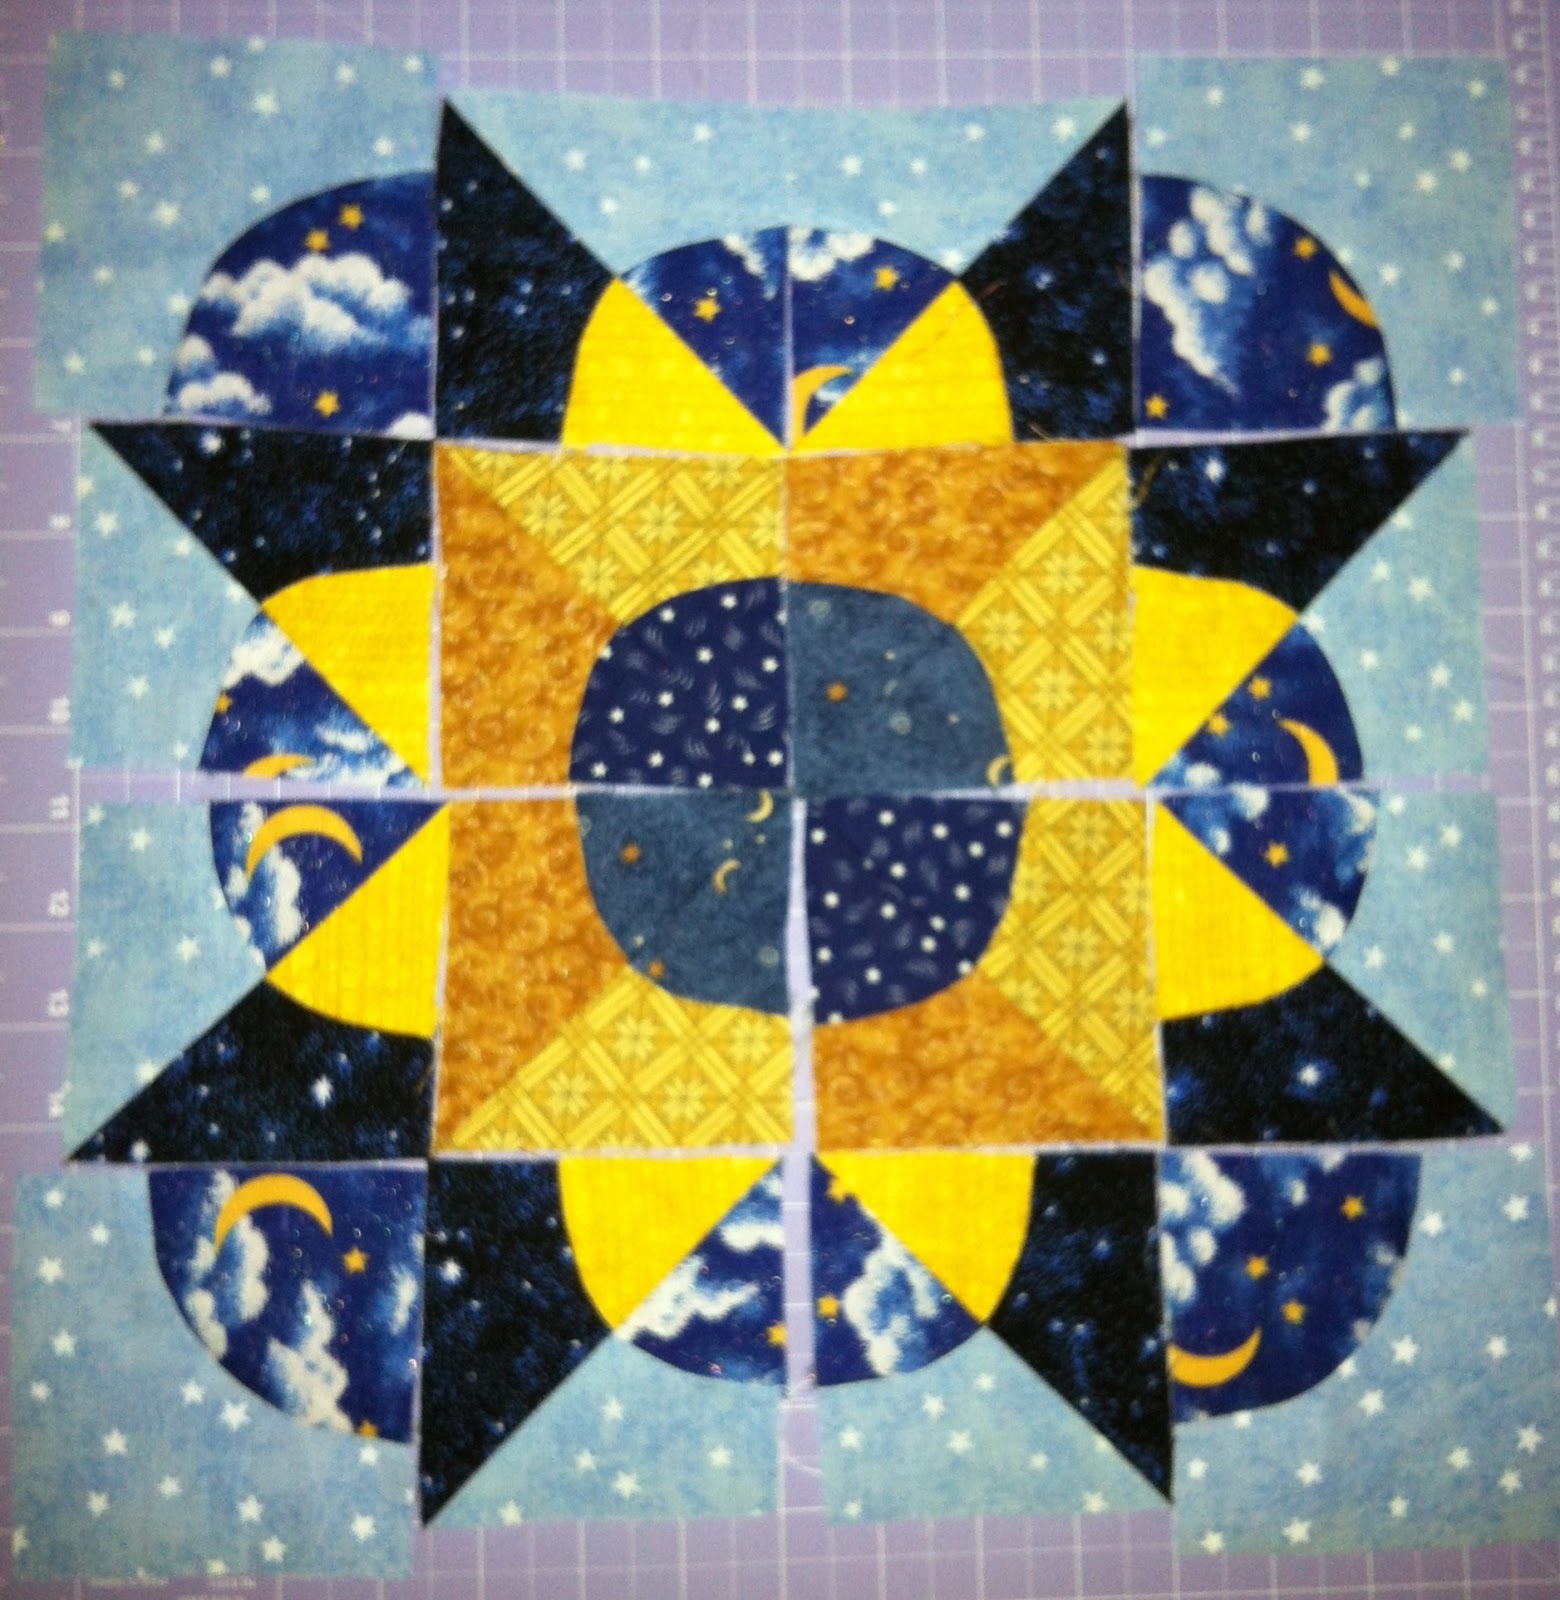
Lay out your pieces, making sure directional prints are going the right way!


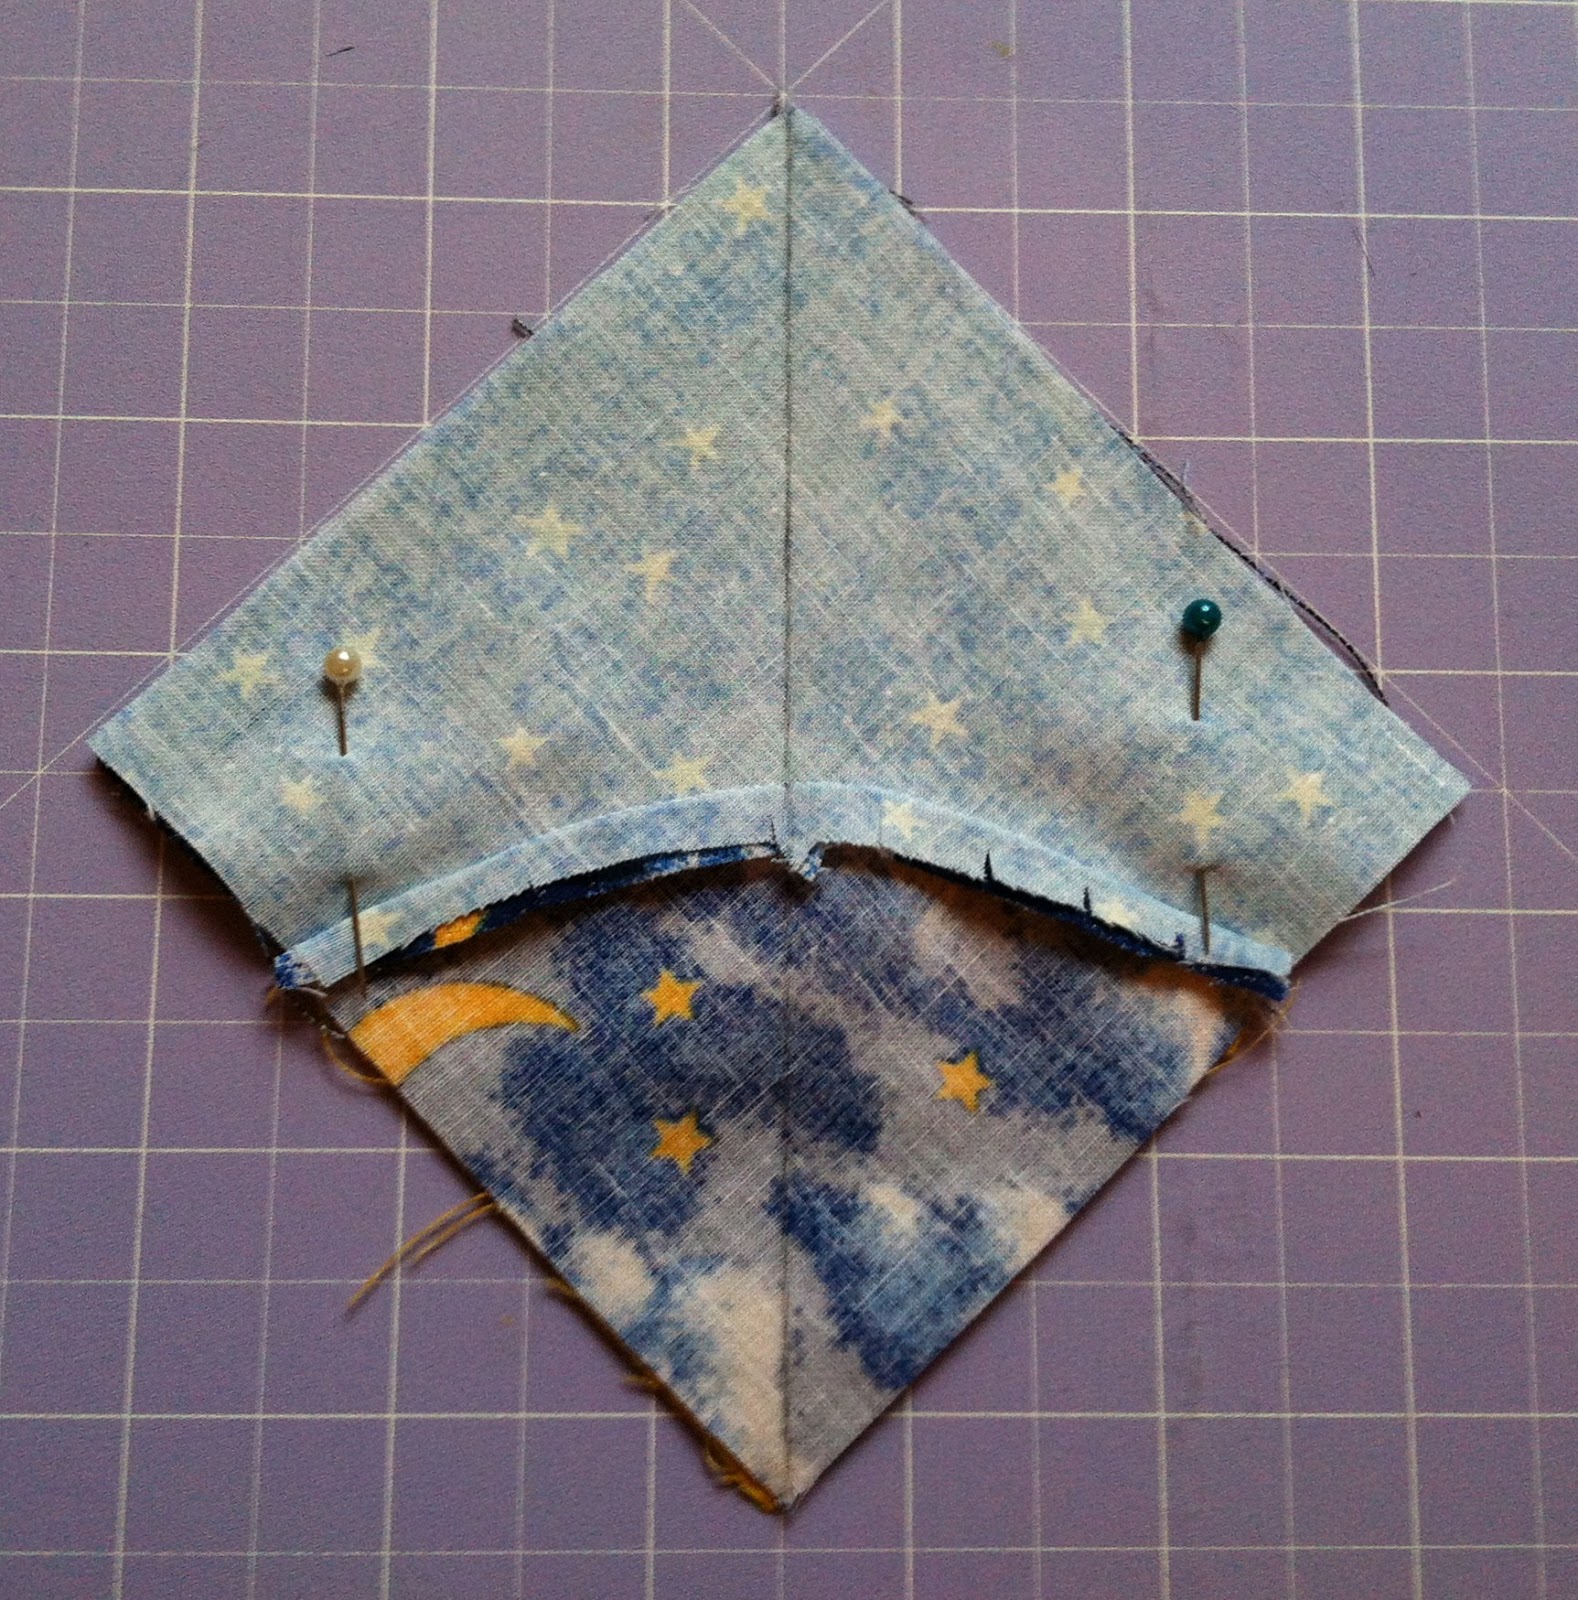
 Step 2: Pair the HSTs so that you have one Main Fabric and one Background Fabric per pair. Open out and press seams according to personal preference.


 Step 3: Join "square" blocks as shown below. You should end up with 6x rectangular blocks. Press seams.


 Step 4: Sew rectangle blocks together to form two columns, pressing seams as you go (quick, we need to mend that broken heart!)


Step 5: Join the two halves of your heart together!


 Step 6: Using the 2.5" Strip Die cut a WOF (Width of Fabric) strip of your Border Fabric. I have marked my die so that I can then place my 2.5" strip down the centre of my die and turn it into a 1.25" strip, but you can also do this using your WOF acrylic ruler and rotary cutter. Sew a strip to each end of the heart panel (approx 6.5" long, but I prefer to cut a little longer and then trim back). Press and then sew a strip to the top and the bottom of the heart panel (approx 10"). Press.


 Step 7: Cut your Backing Fabric and Batting slightly larger than your mug rug flimsy. Baste, and then quilt as desired. I decided to ditch stitch around the heart shape and then have a stab at some FMQ using SewCalGal's January FMQ Challenge design.

My attempt at FMQ!
 Step 8: Using the 2.5" Strip Die cut a WOF strip of your Binding Fabric. If you are using fat quarters you will need 2-3 strips. Join your strips using a 45 degree angle and press the seams open to reduce bulk. Press in half lengthwise, wrong sides together.


The bulk of the seam is spread between the two points.


 Step 9: Sew binding to the back of your mug rug using 1/4" seam. (There are lots of great binding tutorials floating around, Luv in the Mommy Hood has done a "round up" of a few different types)


Step 10: Press the binding forward, fold over to the front and pin so that the edge of the binding just covers the stitch line. I forget which blog I originally saw it on, but someone suggested using a decorative stitch to secure the binding to the front - it's fairly forgiving when compared to ditch stitching, and adds an extra level of interest to your design. I used a feather stitch as my machine is rather limited in it's stitch choices, but I liked the effect it gave.

And there you have it!

Your completed mug rug, ready to give to your sweetheart!


Mug rugs for the whole family!
Seriously though, I took one of these to school when I picked the kids up on Valentine's Day and when Blossom came out of her Kindy class I held it up and said "This is how much I love you!". She squealed with delight and asked if it was for her (which it wasn't, really.. I'd just gifted it to her Daddy!) so I said she could have one of my other ones.. She promptly showed it to anyone and everyone who would look.. the other Mums, her teachers, classmates, even the crossing guard! I did the same thing a few minutes later when I picked up Bean to a very similar response (less with the squealing and showing everyone, more with the heart clutching delight) - so I had to run home and finish off the binding on the other two mug rugs so they could have their own! They even slept with them.

I also made a matching table runner! I can post a tutorial for that if anyone's interested.

So what about this giveaway, you ask? Well.. for being so patient and bearing with me during my tutorial I am giving one lucky reader the chance to win a mug rug kit of your own! I will include pre-cut pieces to make the top including borders and the binding, all you will need is your batting and backing. Wait.. what good is one mug rug on Valentine's Day? Better make it enough for two <3

How do you win? Here's are ways you can win (you need to be a follower):

1. Tell me how you spent Valentine's Day. If you don't celebrate Valentine's Day, that's ok - tell me what you did instead! Or just leave a comment.
2. Follow me (and/or tweet about the giveaway) on Twitter.
3. Follow me on Pinterest.
4. Share this post on Facebook and/or blog it.

The winner will be selected using a Random Number Generator on Tuesday 21 February (10:00am Australian Western Standard Time) with the winner notified by email (and on this blog). Please make sure you're able to be contacted by providing an email address or making sure you're not a no-reply blogger :) International entries accepted.

Wednesday, 4 January 2012

Tutorial: Split Drunkard's Path Star

A while ago I mentioned that I was going to write up a tutorial for the Split Drunkard's Path star block, but I must confess that Christmas and the end of the school year distracted me.. but now all that's over, it's a new year and the perfect time to get back on the wagon!

Split Drunkard's Path block
Step 1. Choose up to 8 coordinating fabrics - 2 for the "background" and 6 for the star. I cut my Drunkard's Path blocks using my Accuquilt GO! cutter and my 3.5" Drunkard's Path die. If you were using this block on its own for a quilt it would look amazing done with the 7" DP die. You will have left over DP pieces which you can use for other stars, or put aside for another project.

Step 2. Cut a total of 16 DP blocks, consisting of:

- 8 x "Background Fabric #1" (Outer curve pieces)
- 8 x "Background Fabric #2" (Inner curve piece)
- 4 x "Star Point Fabric #1" (Outer curve pieces)
- 4 x "Star Point Fabric #2" (Inner curve pieces)
- 2 x "Star Centre Fabric #1" (Outer curve pieces)
- 2 x "Star Centre Fabric #2" (Outer curve pieces)
- 2 x "Star Centre Fabric #3" (Inner curve pieces)
- 2 x "Star Centre Fabric #4" (Inner curve pieces)

Step 3: Pair the DP block pieces, alternating the "Star Centre Fabrics" (eg #1 + #3, #1 + #4, #2 + #3 and #2 + #4). Sew using your preferred piecing method. I pinned the blocks for the first 2 stars, and am now using a Curvemaster foot to piece the blocks for subsequent blocks.. seriously, much more consistent on the seams, with no pinning!

Step 4: Pair up 4 of the "Background" blocks with 4 of the "Star Point" blocks, and the 4 "Star Centre" blocks, matching the inner pieces. 

Step 5: Pin and mark a line diagonally through the centre of the block.

Step 6: Sew 1/4" on either side of the line. (as shown above with grey stitching + white stitching)

Step 7: Using rotary cutter cut along the pencilled line so that you have 2x blocks. Press open.

Step 8: Lay out your blocks to form a star shape. The 4x corner "Background" blocks will be larger than the other blocks as they haven't been cut up, but don't panic.. we'll trim them up!

Step 9: Sew the pairs of "Star Points" and the "Star Centres" together, making sure to match the curves. Attach one set of "Star Points" at the top and the bottom of the "Star Centres" to make a column. Press seams.

Step 10: Trim your 4 "Background" blocks to match your other blocks. I trimmed the outer curve pieces and left the inner curves at full size, but you could trim it evenly all the way around if you prefer.

Step 11: Sew the "Background" blocks to the remaining "Star Point" blocks so that you end up with 3 "columns" of blocks (as shown above). Press seams and then sew columns together making sure to match seams. Press again, and you're done! (Square up blocks as required)

My first Split Drunkard's Path Star complete!

And a second one so you can see it in a different colour
Effective, yes?

Thursday, 13 October 2011

Harry Potter Tumbler Quilt & Christmas Table Runner Update

I finally finished cutting out all my tumbler blocks with Flo, my Accuquilt GO! (Not that it took a long time to do the cutting - that was a breeze! It was finding the time to retreat into my bat cave to sew!) And even better than finishing the cutting, I finally worked out how I was going to lay it all out.. well, the tumbler section anyway! The tumblers will be sashed with the material that will also be used for the backing, and then there will be a plain border around the tumblers and then something along the lines of the split drunkard's path stars as another border/section, and finally the Hedwig Owls will be incorporated into the corners of the quilt. I'm still tossing up whether to put them on point, or have them squared with their bodies pointing in.. I guess we'll see how it all pans out..
My tumbler blocks laid out (wadding is underneath)
 Yesterday was the monthly meetup for my local quilting friendship group, so I packed up Flo the GO!, the fabric for the sashing, my Christmas table runner fabric and my 2.5" strip die. My goal was to  cut the rest of my strips for the tumbler sashing and all the 2.5" squares for my Christmas table runner  (see post here)... I achieved both of those goals as well as doing another couple of informal demo's on the Accuquilt GO! (This time I wasn't really prepared for a demo, having only taken my strip die but no one seemed to mind... infact one lady even asked me if I offered a cutting service because she wants some drunkard's path blocks cut!)
My 1.25" strips (folded - they're not really that short!)

My table runner squares
 Another lady was also very impressed to see how quickly I was able to cut all the 2.5" square blocks - she hand cut 400ish 2.5" blocks only a week or two ago and it took her significantly longer!

I also spent some time sorting through fabric.. the quilting group put out all the donated fabric they'd received in the hopes that people would take some home for charity quilts. I found quite a bit of fabric that I think I can do something with.. once the Harry Potter quilt is finished, of course!

So when I came home I was rather eager to get those tumblers sashed, and here is how things finished up:
I still have to do the horizontal sashing, but I was thinking that perhaps I should cut some tumblers out of the sashing fabric, and then cut them in half to square up the tumbler section so that it's easier to add borders. Once I'm finished I'm considering writing up a tutorial on how to sash tumblers incase anyone is interested? Only because there doesn't seem to be much information about sashing tumblers floating around on the web as far as I can tell..

And then, even though it was REALLY late (nearly midnight!) I had to quickly sew some of my squares together just so that I felt like I'd made some actual progress on my table runner..

Then finally it was time to drive home and go to bed!

Tuesday, 27 September 2011

Tumbling along

Saturday night we went over to my mother-in-law's for dinner, so of course I took the opportunity to escape into my sewing room and work on my apron.. I was perhaps a little optimistic in thinking that I'd actually get it finished, and ultimately the sewing gremlins came along and made sure that didn't happen!
Bodice sewn, curves clipped
 First I basted the lace onto one piece of the bodice before sewing the bodice together... I turned it in the right way to find that one piece of lace had gotten caught so I had to unpick that section, move the lace as far out of the way as possible and re-sew it. Problem solved.
Bodice in the right way, pressed, topstitched and basted
I pressed the bodice, stitched around the edges to keep it all nice and flat, basted the bottom edge and then pinned it to my skirt.. I was so careful not to catch the wrong bits of the waistband and had it all looking perfect.. until I turned it over..
Bodice attached to the skirt
*sigh*
 The waistband got caught in my stitching. And my un-picker was at my house, not in my sewing room. So I got annoyed and decided that was the end of the apron for the evening. But wait! I had new toys to play with.. so let's crank up Flo the GO and try out my brand spanking new tumbler die! *huge sigh of relief* My fabric squares fit perfectly.
Playing around with my theoretical layout (clearly not to scale)
I pulled out my backing fabric and my Hedwig owls so that I could get a (very) rough idea of the layout that was in my head. I ended up deciding that the tumblers will need to be sashed, probably with the backing fabric because when they were butted up against each other they merged into an undefined blob.. and that wasn't really the look I was going for.
Looks much better with the blocks apart, yes?

Then yesterday I went over after school and spent some time cutting and placing more tumbler blocks to get an idea of how I might actually lay them out. I have a significantly larger amount of harlequin style blocks than any other, and I'm not quite sure what I'm going to do about that as far as layout goes... does it matter if I have them adjoining, or should I try and keep them apart?

Also, if anyone has any tips on how I go about sashing the tumbler blocks I'm all ears, otherwise I'll just follow my instincts and we'll see what happens!

Friday, 16 September 2011

Hedwig the Owl (Part 2 - Thursday)

After dropping Bean off at school, Blossom and I went over to my MIL's so that I could finish off my owls. But before I could start sewing, Blossom wanted to go and say good morning to the chookies and see if there were any eggs to collect.
Good morning, girls!

Blossom proudly showing off her haul.
With the "chores" out of the way I was free to finish sewing the rest of my base blocks together and then press them.

The rest of the blocks ready to be pressed

Blossom playing photographer

She's only as tall as the ironing board, can you tell?

Halfway there!
 The morning was mostly spent alternating between the sewing machine and the ironing board, sewing and pressing until.....
Four completed owls! (Well, minus the appliqued eyes)
 Then it was time to give Flo some attention and cut some felt for the eyes. I used the 1" and the 1/2" circles on my Rose of Sharon die. I wasn't sure what colour to do the eyes, so I cut a pair out of each colour that I had and then took a poll. Blossom voted for blue. My husband voted for blue. My girlfriend Linda voted for blue. The blues have it. I also kind of liked the brown, but the blue matches the background fabric nicely. The yellow and the orange are just plain demonic... but would be a great idea for monster eyes (on a different quilt).
Eenie, Meanie, Miney, Mo.. my mother said to pick this one.. Blue!
So this afternoon I went to my local quilt shop to buy some Vliesofix to put on my owl eyes (yes, I realise this is backwards - I should have done that BEFORE cutting) and tomorrow morning (or is that today, seeing as it's 1:45am?) I will attach the eyes to the blocks, although I might just do the white bits for now and wait until I've sorted out the rest of the layout before I commit to a direction for the owls to be "looking"... or maybe I'll just decide to have them looking straight ahead because an owl with half an eye is just plain weird.

Thursday, 15 September 2011

What a busy week!

So it's only been 2 days since my last post, but boy have I been busy! I might have to split my last 2 days into a couple of separate posts just to make things a bit neater & tidier...

First things first though, following on from Tuesday's post about the local friendship quilting group..

I packed up my bags with all my dies, Flo (the GO!) and some scraps, as well as my Christmas fabric, table runner pattern and my Hedwig owl (just to give them an idea of what you can do) plus some lunch and colouring books for Blossom. We turned up about 40 minutes into the day, and Blossom chose an unoccupied table for us near the corner windows (great views!)

The first thing I did after settling Blossom was to check out the display set up by one of the local quilting shops (there are two that alternate each month to come along and display their wares) which was clearly a big mistake as I went from browsing to thinking about buying a $3.50 "scrap" bag, to buying 4 fat quarters for $20, to going on a $75 spree in the space of about 10 minutes (I had to take Blossom to the restroom in amongst all the action!).. but I think it was money relatively well spent... I bought:

4 fat quarters

Three of the fat quarters are to go with my other Christmas fabrics for my table runner.. not because I need more yardage, but for more variety and to break up all the different hollies.. the end one is a forest green with a gold kind of basket weave, then a beautiful cream & gold poinsettia and finally some red & gold baubles. The last fat quarter is a beautiful gold star pattern that was too gold to go with my other fabrics but I just loved it and I thought it would go nicely into Bean's Harry Potter quilt (perhaps the Griffindor crest? or a border? or something else..).
7
A gorgeous travel cutting mat & ironing pad

Cool idea, yes?
Then the girl next to me was looking at this beautiful portable cutting mat & ironing pad (looks like an A4 notebook - I wouldn't have given it more than a passing glance!) and once I realised what it was, I just had to have one.
2x bags of "Allsorts"
 Then I figured that seeing as I was supposed to be doing a demonstration of my Accuquilt GO! for the group I could justify some scraps to play with and add to my stash.. and as an added bonus I ended up with quite the matched set of fabric scraps (below) between the two bags, as well as another two pieces of fabric in the right colour scheme to match the Christmas table runner.
Co-ordinated scraps
I was about to pay for all my bits and pieces when I noticed their pile of fabric panels and decided to sift through them "just in case".. initially I found a cute reindeer kiddie Christmas panel, but then I found an Advent calendar style panel. I've been wanting to buy/make something like this for about 2 years now and just haven't come across what I was looking for. With this one you button a decoration on each day until the tableau is complete, perfect! (And let's just add ANOTHER project to my list...)

The main panel
The daily decorations
After that I decided I had to walk away. Right Now. Really. So I went back to my table and started sorting out scraps to see what was there and what I could use with my table runner. My fabric range for the table runner is now looking pretty good...
My Christmas table runner fabric collection (so far!)
Now don't think that because Blossom and I were sitting in a corner by ourselves that we were lonely.. quite a few of the girls that I'd met when I was going regularly (3-4 years ago) came up to chat and express their disbelief that Blossom was no longer the 6 week old baby that she'd been the last time they saw her.. and there was a visiting quilting group on the table next to me that were there to gift some charity quilts to us to distribute to local victims of the bushfires that went through our area back in February, and they saw Flo and asked lots of questions (before my demo) about what it was and how it worked etc.

After lunch and show & tell it was my 15 minutes of fame.. and let me tell you I don't think it was my finest hour! I mean, I'm sure it was ok, but I know I could have done better if I'd realised that Lyn was actually serious about making me do a demonstration! All the girls loved the GO! and were amazed by how quickly it cut the shapes. The most frequently asked questions I was asked were:

1. Do I sell them? Err, no... Oh really? You should! (Yes.. certainly something to think about..)
2. Can you use it to cut fabric with Vliesofix? (My understanding is yes, but you must count it as a layer. I must have answered that question a dozen times - every time I finished answering someone else would walk up and ask the exact same question)

After my demo it was pretty much time to pack up and go home, so as far as *doing* anything constructive I didn't really do much.. unless you count sorting out/purchasing fabric for my table runner constructive. But I had fun, and they were really keen for me to come back next month (and with my crafty friends ;)) so it was a pretty great day overall.

After picking Bean up from school I then went and spent a couple of hours in my craft room being constructive, but that's a story for the next post!


Related Posts Plugin for WordPress, Blogger...

ShareThis

Online Quilting Class