Showing posts with label tutorial. Show all posts

Tuesday, 29 January 2013

{Tutorial} Selvedge Spider Web block (for QCA bee #2)

The inspiration for this block came from Tallgrass Prairie Studio, but having just made a selvedge string block for Alex in the QCA bee #4 group, I really liked the way Pleasant Home constructed their block using single sided interfacing. So here's my take on a selvedge spider web block:


You will need:
13" square of single sided fusible interfacing
A fat quarter or approx 20cm x WOF "Light Grey" Prima Homespun (from Spotlight)
Assorted selvedges

Step 1:
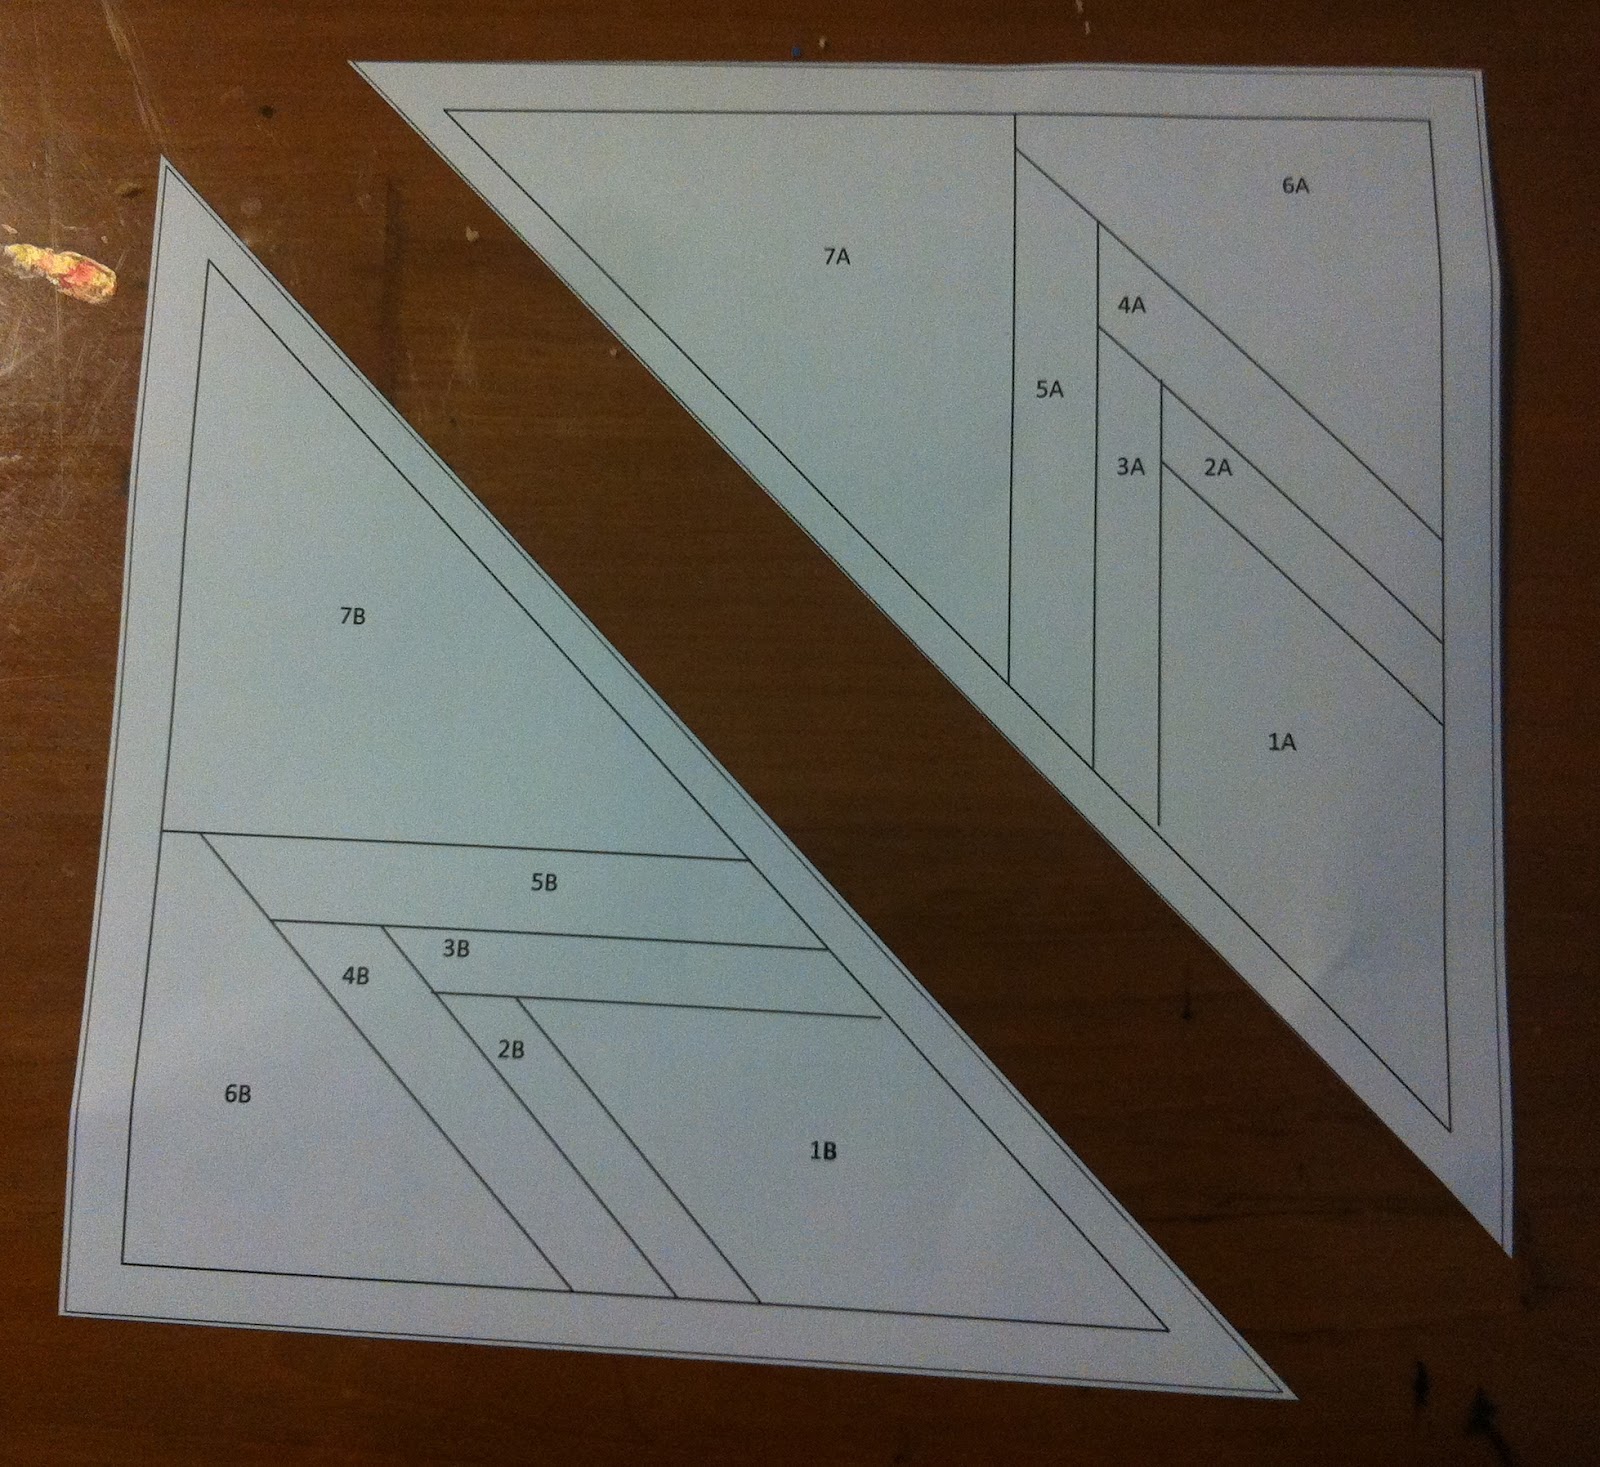
Cut the 13" square of interfacing in half diagonally to create two HSTs. Fold each triangle in half and finger press at the centre point. Using a pen (I used a frixion pen) and an acrylic ruler mark 1/4" up from the edge of the interfacing at the centre point (mark this on the non-fusible side). Also place a mark 4" from the top point on both sides. (see marks on image below)


Step 2:
Place the acrylic ruler so that the 4" mark and the centre base mark line up along the 1/4" mark on the ruler. Mark this line (this is where you will line up your fabric for a 1/4" seam, and the dots are where the seams should be). Do this for both sides.


Step 3:
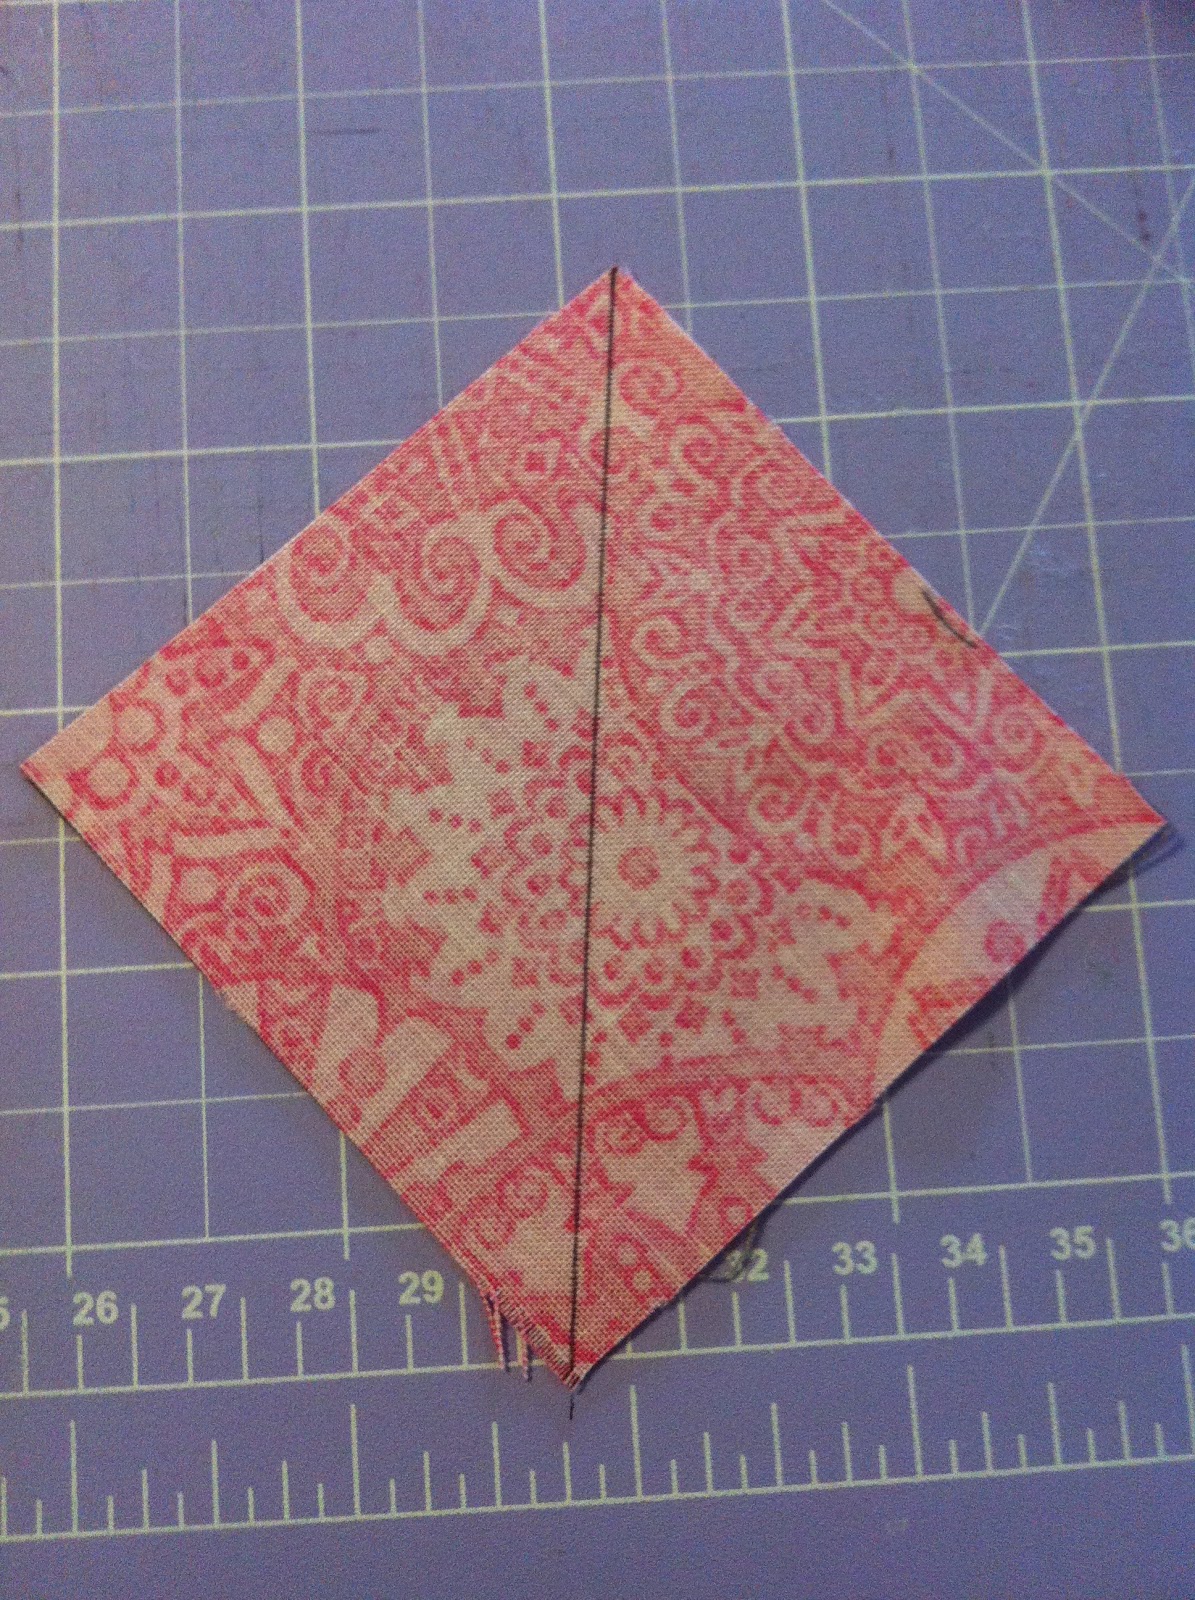
I used my interfacing to trace the kite shapes onto my "Light Grey" background fabric. I lined up one of the (red) lines that I'd marked with the straight edge of the fabric, then used my acrylic ruler to cut along the "top corner" of the fabric. Using my frixion pen I marked the points where the remaining red line starts/finishes. I then removed the interfacing (or you could fold it back, but be careful not to cut it!), matched up the two marks with my ruler and cut. Your kite shaped fabric should fit exactly into the kite shape you have drawn on your interfacing. I also confess that I CAREFULLY pressed part of the grey homespun onto the interfacing so that it didn't move around. You don't want to press too close to the edges though, or inadvertently touch the interfacing with the iron.. just saying!


Step 4:
For both of the triangle sections, choose two selvedges that have atleast 3/4" of fabric design (1/2" will show after seam allowance). Place one selvedge right side down with the fabric edge aligned with the "Light grey" background fabric. Sew 1/4" seam. Gently finger press the seam open (or again, CAREFULLY press with the iron, but make sure that you only do along the seam line as you will need to be able to lift the edge of the seam to place the next selvedge under it). Take the second selvedge and repeat on the other side of the kite.

Step 5:
As per Pleasant Home, gently place a selvedge with the fabric edge underlapping the selvedge edge. Make sure that there is enough fabric underlapping, especially on selvedges that have the fuzzy ends. Keep underlapping selvedges until you get close to the end of the triangle. use a scrap piece of fabric to cover each end (also underlapping the final selvedge). Now you can use your iron to press all the selvedges down onto the interfacing to hold them in place.


Step 6:
Top stitch along the edge of the selvedges. Make sure that you have caught the fabric edge of the selvedge underneath. Once all the selvedges have been secured you can turn over the triangle, align your acrylic ruler with the edges of the interfacing and trim down your block. You should now have two gorgeous selvedge triangles!


Step 7:
Place the two triangles right sides together, making sure to match up the grey kite points. Sew 1/4" seam, making sure to pass through the points where the kite points intersect. Fingerpress seam open, then press with your iron from the right side. You will now have a finished 12.5"  selvedge spider web block (12" finished in a quilt top). Don't feel that you need to trim the blocks down to 12.5" as I am happy to do that once I've received them.


Monday, 25 June 2012

Tutorial: Chain Web Piecing

I was reading a blog post a while ago that mentioned chain piecing in a web, but it didn't explain how to do it and when I went back to try and find the post I couldn't remember where I'd originally read about it. But I really liked the idea and decided to work it out for myself... and now you can do it too!

If you're wondering what chain web piecing is, it's a form of chain piecing that helps keep all your blocks in order and can be used for anything from individual blocks to piecing whole quilt tops (in row format). 

The block I'm demonstrating with is the Starflower block made famous by Ellison Lane, but I first used this with my Split Drunkard's Path Star blocks (as previously mentioned) and I now use it as my default block piecing technique (as applicable - it doesn't really work with different sizes/shapes in the same block).

Start by laying out the blocks/quilt top to be pieced in your desired layout.

Place the 2 pieces from each row right side together as shown. Chain piece as normal, but do not cut once complete!

*I don't know why, but I always seem to start from the end of the rows.. there is no reason you couldn't start at the beginning.

Step 3: Press seams open, or if you prefer to press to one side you'll need to alternate sides for each row.

Step 4: Lay out your still chained pieces right sides up, and then align the next blocks for each row right side down (as shown below). 

Chain piece as before and press seams.

Continue to repeat layout, (pin,) chain, press sequence for all blocks in the row.

(Pin blocks if desired - this is a good idea to keep them in order if you have quite a few rows)

(As you can see, it keeps the rows in order so you never have to worry about accidentally sewing them in the wrong order or upside down, and if you're chain piecing multiple blocks you don't have to worry about keeping each block separate so that you don't mix your blocks up because it comes together automatically.)
Once each row is complete, fold one row over and pin at seams. The beauty of leaving them chained is that all your seams are already roughly lined up!

To speed things up I like to pin two rows at a time and then sew. Press. You will find that at this point you will need to press to the side, or if you'd prefer to press open you will need to snip the thread chain to allow the seams to open up. I pressed to the side for these, but that's because I'm lazy and I never seem to have scissors in the right place at the right time!

Repeat for all rows (in my case this only leaves one final seam to pin, sew, press) until your block/quilt top is complete.

And here's my completed block (visualise your block or quilt top here)..

Aside from being relatively easy, this technique really works well when you are piecing multiple blocks (eg Starflower or Split Drunkard's Path Stars) as you can chain piece all the blocks to the web stage, (cart them to a quilt guild meeting, or a bee group, or a friend's place as desired) and not inadvertantly mix block pieces up.. and then all you need to do is sew the final 3 (or however many) horizontal seams on each block and you're done! Streamlined, accurate, quick and easy - this lazy girl's idea of perfect piecing!

Sunday, 10 June 2012

Tutorial: The Thrifty Housewife - A Desperate Housewife's Quilt Block

The lovely Jane of Quiltjane and Want it, Need it, Quilt! fame has spent the last year designing blocks for the Desperate Housewife's Quilt. Every week for the last 50 weeks she has dreamed up a new 8" finished quilt block, and encouraged some of her bloggy friends to help her reach 100 blocks in total.. and now that we're right at the end, it's my turn to show you the kind of Desperate Housewife I am!

I was originally planning to call my block "Heart of the Home", because isn't that really what all wives & mothers are? (Whether they're desperate or not!) But as I was turning my block from a concept into a reality, my inherent thriftiness came to the fore and I decided that I was going to call my block "The Thrifty Housewife"!

So what do you need to make this block?

* 4-5 charm squares in a range of prints (4 if you want the 1/2 hearts the same, 5 if they're different/part of a multiple block layout)
* 1 fat quarter of background fabric
(I turned mine into a 4 block layout that used a total of 16 charms and less than 1m of back ground fabric including backing.)


Step 1. Cut a 3" square from each charm square.


Step 2. With the remaining piece of the charm square, cut diagonally to create a 4" HST. (You will end up with two "chisel" shaped pieces left over - don't throw these out!)


 Step 3: From your back ground fabric, cut 8-10x 3" squares (8 if you're using 4 charm squares, 10 if you're using 5 charms) and 2-3x 4" squares (2 for 4 charms, 3 for 5). Subcut the 4" squares diagonally into 4" HSTs.


Step 4: Place the 3" print square right sides together with the 3" background square, and draw a line diagonally as shown above.


Step 5: Sew 1/4" from the line on each side.


Step 6: Using your rotary cutter, cut along the drawn line.

Step 7: Place 4" print HST and a 4" background HST right sides together and sew using 1/4" seam allowance. (not shown)


Step 8: Press all HSTs open.


Step 9: Trim the two smaller blocks down to 2.5" square, matching the diagonal line to the 45 degree mark on your ruler.


Step 10: Trim the larger block to 3" square, matching the diagonal line to the 45 degree mark on your ruler.


Step 11: Place the 3" block and the remaining 3" background square right sides together, and mark a line diagonally as shown.


Step 12: Sew 1/4" on either side of the line and then cut along marked line. Press open.


Step 13: Trim blocks down to 2.5" square, aligning 45 degree line, and tip of triangle at approx 1.25" (as shown).


Step 14: Lay out your pieces as shown. This creates 1x heart which is 1/4 of the total block.


Step 15: Sew pieces as shown to create two halves of the heart. Press.


Step 16: Lay out your hearts, you should have a total of 3 full hearts (1 top row, 2 bottom row) and 2 half hearts (top row). Join as shown so that you have 4x squares. Press.


Step 17: Join the two top blocks, and the two bottom blocks to form two strips. Press. 


Step 18: Sew the top row and the bottom row together, press. Your block is now complete!


Join two or more blocks together horizontally to create a chain of hearts (would make a lovely border! Or a mug rug, or a table runner..)

Or join four or more blocks together to make a table topper, doll or cot quilt!

And remember that part about saving the "chisel" shaped charm square off cuts? That's where the real thrifty housewife part comes in! You could piece them together to create a separate mug rug/mini quilt or use it to to back your Thrifty Housewife block - either way, you'll maximise the use of your charm squares and end up with something cute and fun as an extra bonus :)

Saturday, 2 June 2012

Lone Starburst Paper Pieced Block Tutorial (for QCA Bee #2)

As requested, here's a tutorial for the Lone Starburst paper pieced block (for templates used see The Quilting Climber). Please note that this post is VERY pic heavy!

Print off 4x templates as shown. Make sure that your  1" square test block is 1" square! Phillipa and I found her printer needed to be set on US letter to print correctly, A4 came out smaller!

Cut out your templates. There will be an A & B piece.

Repeat for all sheets, until you have a total of 8 sections (4x A, 4x B). I trimmed mine with a little extra margin so I could trim them down after I made the blocks.

Choose your fabric colour scheme

 I found it more efficient to pre cut my pieces so that I could semi chain piece my blocks. You can do it however you want! I measured and cut my diamond shapes from an approx 3" strip, with diamonds ~5" "long". Make sure that all of section 1A/1B is covered, I also covered sections 2 & 3 (for seam allowance).

 I used white for the middle strip, and two aqua prints for the outer strip - for both of these I cut approx 1.5" strips and then subcut into pieces approx 4" (white) & 5" (aqua) long. Make sure that the strips comfortably cover their section, keeping in mind that when they are folded & pressed they will angle in the opposite direction. If you don't cover their section with room to spare you will find yourself spending a LOT of time frogging seams. Trust me, I know.. Btw, you will need 8x diamonds but 16x strips in each colour.
Set your stitch length to 1.5 to make it easier to remove the paper later.
 Ok, now we finally get to the sewing!
To align your fabric for sewing, hold your template up to the light and place the diamond so it completely covers section 1A/B. Do this on the opposite side to the printed text as you will need to see the text/lines to know where to sew! The diamond should be "right side up" (wrong side touching the paper).

Line up one of your strips (in my case, white) along the edge of the diamond, or so that it covers the 2A/2B line. The strip should be "right sides together".
 
 Start from the intersecting point (where 2A/2B meets 3A/3B) and sew until you reach the end of the template (even though the line isn't marked into the seam allowance).
Fold template back along the stitch line and trim to 1/4" seam allowance to reduce bulk.

Press open.
 
Place the 3A/3B strip in place.

Sew along the 3A/3B line, trim and press open.

Repeat for 4A/4B

and 5A/5B


 For my background fabric I cut 8x 5" squares, and then subcut into HSTs. You could cut smaller/more accurately sized pieces if you like, I was just avoiding more frogged seams! If using HSTs, align as shown above, and then sew along line 6A/6B.
Trim seam allowance to 1/4" and press open.

Align final piece..

Sew along 7A/7B, then trim to 1/4" seam allowance..

and press.

Trim excess fabric using acrylic ruler and rotary cutter.

You should have on beautifully sharp, perfect section!

Part A & B complete

Repeat for all 8 pieces/4 sections

 Take an A section and a B section. Align the seams, trying to match the strips as closely as possible. Pin as required. I left my paper in until the block was complete so that I didn't stretch/distort the block, but this is personal preference.

Sew along diagonal seam allowance marking

Press seam open

I then carefully removed a section of the paper where the 4 sections will meet - this was because when I did my first blocks it was very hard to remove the paper once all 4 sections were joined.

Repeat for the other 3 sections

Pin two sections together, matching strips as before.

Sew along seam allowance line.

Press open

Repeat for the other half

Pin both sections at the centre seam and matching the other strips as closely as possible.

Sew along seam allowance line, press seams open. 
Yay! Your block is complete! Mine measured approx 11.75" at this point, but once the paper was removed it ended up around 12.25". If your block is approx 12", it's good enough for me! Now you can either grab a drink, pop the TV on and indulge in the therapeutic properties of removing all the paper, or you can post it with the paper still attached and I'll do it later :)

My 3 test blocks :)

Related Posts Plugin for WordPress, Blogger...

ShareThis

Online Quilting Class