Showing posts with label tumbler. Show all posts

Monday, 11 June 2012

The Harry Potter Quilt, complete!


It just occurred to me that I never posted about the Harry Potter quilt once it was completed! I managed to get it done in time to present it to Bean on his birthday - yay! He was very pleased with it, and it has been on his bed ever since. He then promptly requested a Pirates of the Caribbean quilt for his next quilt, to which I replied that his next quilt is quite a way down my list!

Using painter's tape to baste the backing fabric to the floor  

And some more painter's tape to secure the batting

Quilt top in place, and ready to pin

Pinning, pinning and more pinning.
 I must have spent 2 hours pin basting this quilt.. I pinned every tumbler block, which was like 132 pins.. and then there were the Split Drunkard's Path Stars and the owls etc. My knees and my back were killing me by the end of it, I was walking like a little old lady! Even my fingers and palms took a beating. Next time it will be spray basting for a project this large!

On the upside, none of the pins were "in my way" when it came to the quilting, and it was quite therapeutic when I got to remove them finally!

Centre section basted and ready to go!

Gosh I love how the stars turned out - they're seriously my favourite part of the quilt!

Simple ditch quilting
 I decided that the quilt really wouldn't suit an all over quilting design due to all the different elements, and the good old "stitch in the ditch" was really the perfect option. I bought two different threads, a mid-dark grey for the back of the quilt and a mid grey-blue for the quilt top. They ended up blending so perfectly that you almost can't see the thread.. and the back of the quilt looks amazing because the quilting really makes the design stand out even though the backing fabric is charcoal grey.

I did some free motion quilting at the top and the bottom of the quilt where the blue fabric sections are - I attempted a spirally wave type of design that turned out better than I expected (but certainly not pro by any means!). I think it adds some movement in a subtle kind of way.

On the bed, ready to go!
I know I've said that if I'd had any idea how much time, effort and thought/planning/quilt math would be needed to complete this quilt I probably would have sucked it up and paid $90 for a Harry Potter quilt panel on eBay.... but really, it turned out so much better than I could have hoped for and I'm really rather pleased with myself. It's definitely the biggest, most ambitious and intricate project I have ever taken on (it really makes their "baby quilts" look tiny and insignificant) and it's nice to know that I can pull off something more than a lap sized quilt.

Now I just need to do some work on that king sized quilt I'm going to make for the husband and myself! (Don't hold your breath for that to be finished any time soon - I've only made one Swoon block so far!) And before I do that I have some BOM blocks to catch up on and a couple of swap projects to complete.. it's kind of nice to not have a major project with a deadline looming!

Incase anyone is interested to note, almost all the pieces of this quilt were cut using my Accuquilt GO! fabric cutter, using the 3.5" Drunkard's Path, the small Tumbler and the 2.5" Strip Dies. That includes all the sashing and the binding (LOOOOVE my 2.5" strip die!).

Thursday, 5 April 2012

Harry Potter quilt update

It's been ages since I've written an update on the Harry Potter quilt, and that's mostly because once I realised I wasn't going to have it ready before Christmas and it would become Bean's birthday present I just sat on it... because I had *time*... like a whole 6 months... except time has gotten away from me and now I have just less than a month. I can't disappoint my son by not having it ready in time for his birthday - he's been asking when he's getting his Harry Potter quilt and it makes me feel so guilty!

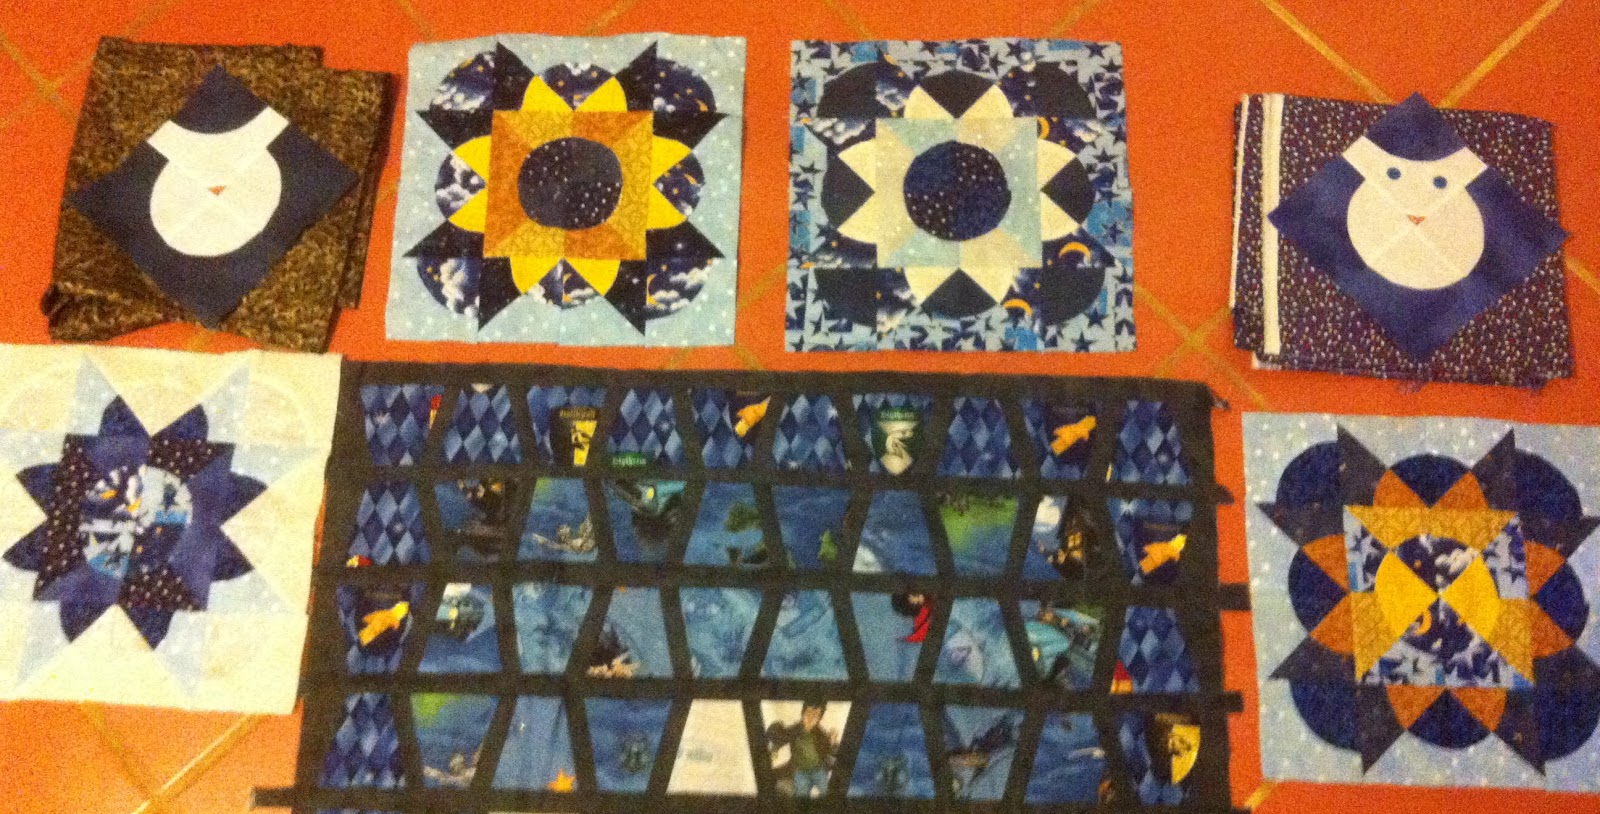
But over the last 2 weeks I've been on a roll - I completed the rest of the Split Drunkard's Path Star blocks, and laid it out so I could get an idea of how all my pieces looked together:
All my blocks, roughly placed.
 Next step: Making the owl blocks the same size as the star blocks. This shouldn't be too hard, right? It's just a case of cutting some triangles and sewing them on...
Auditioning 2 different fabrics as potential backgrounds for my owl blocks.
 I went with some blue "feedsack" (repro, of course!) fabric I'd bought at Spotlight, drew a scale drawing of my block and the "finished size" block and then used my ruler to work out how big my HSTs needed to be in order to make my block the right size. Luckily for me, it went together pretty smoothly. (Clearly my quilt math was ok!)
My larger owl block (unpressed)

Blocks laid out again with the larger owls
The next day I worked out how I was going to sash the stars to make them fit and have now turned them into strips of stars (but I forgot to take a photo) and I went and purchased a complimentary fabric that will go at the top and the bottom of the quilt top to make it longer. I think the width will be fine once it's all sashed and put together properly.

I haven't had a chance to touch it since last Thursday/Friday though as my husband and I have spent most of our spare time playing with Daisy, my new embroidery machine. (He is playing with another design he's digitized as we speak! I am sure he's getting WAY more out of this toy than I am! Oh, and my sister-in-law had her baby, so we've been visiting my new nephew!) Hopefully I'll get a chance to go to Phillipa's in the morning for our regular Thursday sewing morning and work on it some more then. Only 25 more days until it needs to be finished!

Tuesday, 1 November 2011

Tutorial: How to Sash Tumbler Blocks

So you'll have to forgive me because this is my first tutorial and I can't guarantee that it will be any good! When I decided to sash my tumbler blocks for Bean's Harry Potter Quilt I found that there wasn't an awful lot of information available online about how to sash tumblers. So incase anyone else is interested in sashing tumblers, here is how I did it..

Just a quick note, while I used my Accuquilt GO! to cut my tumbler blocks and strips you can also do it all with a rotary cutter and acrylic templates :)

Step 1. Cut out your tumbler blocks. I used the Accuquilt GO! 3.5" tumbler die (which is also compatible with the GO! Baby). Lay out your tumblers in your preferred pattern.

Step 2. Cut strips using the GO! 2.5" strip die (I used the Baby compatible strip die that cuts 2 strips at a time). I marked my strip die so that I could lay a 2.5" strip along the centre blade and end up with 2x 1.25" strips.

Lay strip along centre blade to end up with 2x 1.25" strips

From 2.5" to 1.25"

 Step 3. Using your rotary cutter, cut your 1.25" strips into 4" lengths. Place one strip on the right hand side of each tumbler block, except the last tumbler in each row.

Step 4. Chain piece the each tumbler+strip. I did these in their row order so that I didn't get my blocks mixed up. Trim the strips to match the edges of the tumbler blocks. I will show you why this is important later!

Square up your tumbler blocks. I promise you, it will save your heartache later!

 Step 5. Align your two tumbler+strip blocks. Yes, these are meant to look like they're on an angle - they will straighten out when you press them. The notches on the Accuquilt tumbler blocks make the alignment a breeze. Sew together (these are fairly easy to chain piece as well, but if you find it confusing don't worry about it!) and repeat until your row is complete. Repeat for all rows. Press seams (if you haven't already).

I pressed my seams open, but you can do them to one side if you prefer.
The bottom row is not straight, compared to the top row.

This is what happens when you are lazy and don't square your blocks. I had to unpick them and fix them.
LAZY = More work overall!

I started from the middle and worked my way out.

I also got impatient and pressed all my seams at the end.
I mean, here are all my completed rows!
Once my rows were complete I realised that it would be easier to do the horizontal sashing if the rows were squared up. This led to:

Step 6. Cut enough tumblers from your sashing fabric to match the number of rows (eg, I had 12 rows, so I cut 12 tumbler blocks). Fold them in half and crease. Open back out, place a quilting ruler along the fold line and cut in half using your rotary cutter. This gave me 24 half tumblers - one for each end of the 12 rows.

Crease in the centre

Place quilting ruler along the fold line & cut

Half tumbler blocks

Place half blocks at the ends of each row.
 Step 7. Sew half tumblers to each end of your rows. Press again.

Step 8. Lay out your rows and measure your longest row. Cut the 1.25" strips to suit. (I added a little extra for good measure)

 Step 9. You can start wherever you want but I started in the middle because that was where my design started and I wanted everything to match up from there. Attach sashing to one of the centre strips. Press.

 Step 10. With right sides together, align tumblers. Match the centre point and the ends. Hold fabric taut as it feeds through the machine (see note below.) Press.

Note: You can pin as much as you like - I pinned each end, and the centre. Some of my rows appeared to be a fraction shorter or longer than the one preceeding it. This is most likely because I am lazy and my sashing was not 100% exactly 1.25". I overcame this by matching the centre point and the ends and then holding the fabric taut as it fed through the machine so that a) the row stretched or b) the sashing stretched as needed. Almost all of my blocks ended up matching perfectly  (or near enough) - there was only one that was visibly offset by a max 1/8" (bottom RH corner).
Pin at the centre point

Open out and press.


 Step 11. Pin sashing to each edge. It will come together quicker if you do two rows together instead of each row individually. Sew and press.
 Step 12. Repeat steps 11 & 12 until all rows have been sashed.

Step 13. Complete as required - border, bind, quilt etc.
Complete! (Well, just needs squaring up..)
As for me, now that the central tumbler section is complete I can move on to the split drunkard's path stars that I'm planning to use as a "border". Stay tuned!

Saturday, 22 October 2011

Poppies, parcels and progress..

It's been a pretty crazy week, but honestly I won't bore you with the details! Instead I'll share with you some photos that I took of flowers in my mother-in-law's garden, my order that arrived from Quiltjane, and some of the progress that I made on my Harry Potter quilt and my Christmas table runner..
 My mother-in-law used to have a garden filled with these beautiful pink mop-head poppies. When my husband and I were first dating I used to love going to their house when the poppies were out because they were just gorgeous and divine and beautiful. When we moved up into the hills 4 years ago my MIL gave me some of her poppy seedlings to plant in my garden. Every single one was plain red single layer poppies. Infact, every single poppy either of us has grown in the last 4 years has been red. We figured that the poppies must have reverted or something because my MIL had never had red poppies. And I was sad because I thought I'd never again see those beautiful pink mop-head poppies... and then on Wednesday, what did I see???? There was one little pink poppy amongst the red! Oh happy day!

 That doesn't mean that I don't like the red ones though, don't get me wrong.. there's just something kinda special about those pink ones, you know?
 And Cosmos.. I love cosmos. A couple of years ago I had them flowering profusely in my garden in shades of pink.. light, dark, in between! This year my winter grasses have taken over my garden and I've given up hope of anything being visible in there. But one, single plant has also come up in my MIL's garden.. doesn't it just look cheerful? I know I have some seeds saved somewhere.. when we move in I might scatter some more seeds and see what happens!

 My package from Quiltjane's Want it, Need it, Quilt! store came yesterday! Woohoo! Look at all that fabricy goodness. I must say that I was surprised by how much MORE I loved Kate Spain's Good Fortune in real life than I did online! I think I'll be buying more of that once I lift my fabric buying moratorium. I also can't wait to play with my Grace layer cake.... I think I have the perfect pattern picked out.
And isn't Jane a sweetie? She sent me a teeny tiny 2.5" square baby charm pack of Antique Fair. I love it!
 When I finally got around to doing some "real work" I cut some tumbler blocks out of my black backing fabric and then cut them in half so I can put them at either end of my tumbler rows. This way they will square up nicely and it will be easier to do the horizontal sashing. Unfortunately my MIL broke her ironing board(!!!) so I can't press my seams until Monday (Well, I suppose that's not strictly true, but it's a good excuse to move onto another part of my project!).
All my rows chained together (when I added the 1/2 tumblers to each end)

 And while I was chain piecing, I finished stage 1 of the Christmas table runner piecing..
I was clearing out the kids drawers the other day, putting aside all the clothes they've outgrown to keep or send to Good Sammy's (thrift shop).. but at the last minute I pulled out all the flannelette pyjamas. I think I might upcycle them into a snuggle rug. Maybe even try out a rag quilt. If I unpick all the seams I can then send them through my Accuquilt GO! and turn them into squares and half square triangles. I just loved my babies toddling around in their flannel pjs, and if I turn them into a quilt they can be used for sleepovers etc and I can enjoy them all over again. Is that a crazy idea?

Thursday, 13 October 2011

Harry Potter Tumbler Quilt & Christmas Table Runner Update

I finally finished cutting out all my tumbler blocks with Flo, my Accuquilt GO! (Not that it took a long time to do the cutting - that was a breeze! It was finding the time to retreat into my bat cave to sew!) And even better than finishing the cutting, I finally worked out how I was going to lay it all out.. well, the tumbler section anyway! The tumblers will be sashed with the material that will also be used for the backing, and then there will be a plain border around the tumblers and then something along the lines of the split drunkard's path stars as another border/section, and finally the Hedwig Owls will be incorporated into the corners of the quilt. I'm still tossing up whether to put them on point, or have them squared with their bodies pointing in.. I guess we'll see how it all pans out..
My tumbler blocks laid out (wadding is underneath)
 Yesterday was the monthly meetup for my local quilting friendship group, so I packed up Flo the GO!, the fabric for the sashing, my Christmas table runner fabric and my 2.5" strip die. My goal was to  cut the rest of my strips for the tumbler sashing and all the 2.5" squares for my Christmas table runner  (see post here)... I achieved both of those goals as well as doing another couple of informal demo's on the Accuquilt GO! (This time I wasn't really prepared for a demo, having only taken my strip die but no one seemed to mind... infact one lady even asked me if I offered a cutting service because she wants some drunkard's path blocks cut!)
My 1.25" strips (folded - they're not really that short!)

My table runner squares
 Another lady was also very impressed to see how quickly I was able to cut all the 2.5" square blocks - she hand cut 400ish 2.5" blocks only a week or two ago and it took her significantly longer!

I also spent some time sorting through fabric.. the quilting group put out all the donated fabric they'd received in the hopes that people would take some home for charity quilts. I found quite a bit of fabric that I think I can do something with.. once the Harry Potter quilt is finished, of course!

So when I came home I was rather eager to get those tumblers sashed, and here is how things finished up:
I still have to do the horizontal sashing, but I was thinking that perhaps I should cut some tumblers out of the sashing fabric, and then cut them in half to square up the tumbler section so that it's easier to add borders. Once I'm finished I'm considering writing up a tutorial on how to sash tumblers incase anyone is interested? Only because there doesn't seem to be much information about sashing tumblers floating around on the web as far as I can tell..

And then, even though it was REALLY late (nearly midnight!) I had to quickly sew some of my squares together just so that I felt like I'd made some actual progress on my table runner..

Then finally it was time to drive home and go to bed!
Related Posts Plugin for WordPress, Blogger...

ShareThis

Online Quilting Class