Showing posts with label Bonnie and Camille. Show all posts

Thursday, 30 August 2012

Happy Blogiversary to Me! {GIVEAWAY}

Yes, that's right.. it's been a whole year already.. funnily enough it feels like a lot longer!

As promised, I'm throwing another giveaway to celebrate 1 year and 100 followers. If you're looking for my Quilting Gallery Blog Hop giveaway for an Aurifil Thread Card, check this post!

Today I have the pleasure of offering up a PDF pattern from one of my FAVOURITE fabric and pattern designers, Camille Roskelley! But which one? Well, that's up to you!

Camille has some of the most adorable patterns, like...

Image source: Thimbleblossoms
or maybe..
Image source: Thimbleblossoms

or even...
Image source: Thimbleblossoms

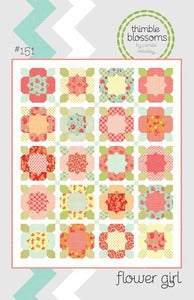
and my all time favourite..
Image source: Thimbleblossoms

To enter, you'll need to go to Camille's webstore and tell me which pattern you would love to win. One comment, that's it! I've decided that this giveaway will only be open to followers because I think that loyalty should be rewarded :)

Don't forget to leave me your email address, just in case you're a no-reply blogger - I'd hate for you to miss out because I couldn't reach you! The giveaway closes one week from today, on Thursday 6th September at 7pm Western Australian Standard Time.

So what have I discovered in my year of blogging? Well, for a start I've discovered that there are some amazing people out there in the blogosphere! I've made friends with some gorgeous, talented people, some of whom I've had the pleasure of meeting in real life. Through blogging I discovered the Quilt Club Australia facebook group, and through the QCA I've joined a bee group, and swaps and travelling stashes. I've also participated in other online blog based swaps. I've learnt how to use twitter and flickr. I've written tutorials. I've participated in blog hops. I've learnt new techniques, and along with my new skills I've developed more confidence. I've discovered that there's more to fabric than just "big box" stores!

I don't think I could accurately list all the things I've picked up along the way! Being a part of the blogging and wider online quilting community has changed the way I think about my craft. I am so lucky to have "met" you all, and learnt from the talented people around me.

On that note, I'll leave you with a few of my favourite finishes from the last year :)

Wednesday, 9 November 2011

Tutorial: Easy Disappearing 9 Patch Table Runner

So it's Bonnie & Camille week over at Sharon's Craizee Corners, and today is the day that I'm guest posting! Yay!


I made a super easy table runner using Bonnie & Camille's Ruby. It's a birthday present for a girlfriend's 30th on Sunday - She's going to love it, right? I hope so!


Incase you have someone that you'd like to make a table runner for, or if you want one of your very own, this is how I did it....

Step 1: Lay out 9x charm squares. Note: Keep in mind that the outer corners are the ones that "stay whole" and the middle square is the one that ends up the smallest.


 Step 2: Sew into 3 strips of 3 squares (below). Press seams.

  Step 3: Pin 2 strips together, matching the seams. I pinned the other strip at the same time so that I could feed them through consecutively. Press again. Repeat steps 1-3 twice, so that you end up with 3x 9 patch blocks.

Step 4: Take your 3x 9 patches and slice them down the middle horizontally & vertically using your rotary cutter & your ruler. This will give you 4 blocks per 9 patch, totalling 12 blocks.
Step 5. Play around with your blocks until you are happy with your layout. As I decided to make mine look like 3x bordered 4 patch blocks I assembled my blocks into the 3 squares first and then joined those together. To do this, start by joining 2 blocks making sure to match the seams. Repeat until you have 6x rectangle blocks. Press.

 Step 6. Pin 2 of your rectangles together, making sure to match your seams. Sew and press. Repeat until you have 3x square blocks.
 Step 7. Pin the square blocks together, sew and press. You now have the top of your table runner completed.

 Step 8. Lay out your wadding, your backing fabric "right side up", and your table runner flimsy "right side together" against the backing fabric. Pin at regular intervals. Sew 1/4" seam around the edges, leaving an opening approx 4" long.

 Step 9: Using your quilting ruler trim the edges of the wadding and/or backing fabric. Gently turn the table runner in the right way. I used a knitting needle to gently push the corners out as far as I could. Press.


  Step 10: Topstitch around the edge of the whole table runner, approx 1/8" from the edge. Decide on a quilting design... I would desperately have loved to be able to FMQ my table runner, but having never tried FMQ I wasn't prepared to take the chance at ruining a gift! Instead I went for plain diagonal lines that I eye-balled instead of marking. It's lucky that it didn't end up wonkier! Weave in any loose threads, press and.... you're done!
The matching spotty backing fabric (from my stash) 


And there you have it.. a super easy 9 patch table runner. With the leftover charm squares you could whip up some matching mug rugs! A second charm pack would give you enough to make some gorgeous 9 patch placemats, too. (I'll be posting some pictures of some disappearing 9 patch placemats my girlfriend Phillipa made at our Tuesday Stitch 'n' Bitch on our Needles in the Haystack blog)

Monday, 7 November 2011

It's Bonnie & Camille Week over at Craizee Corners!

Head on over to Sharon's Craizee Corners blog to check out what she has going on for her designer spotlight week. This week she's focusing on Bonnie & Camille, with a group of guest bloggers joining her to share their projects using fabrics from Bonnie & Camille's lines including Cotton Blossom, Simple Abundance, Bliss or Ruby.

Today's (Monday) guest post is by Melissa from Sew BitterSweet Designs who has made the most gorgeous Ruby quilt. And make sure to check back again on Wednesday, because guess what?! It will be ME that will be guest blogging! Woohoo!

Here's a sneak peek of what I have up my sleeve...


Tuesday, 18 October 2011

Moda Pre-cut Fabric Binge

Incase I hadn't spent enough on fabric recently, I've been pondering some of the pre-cuts in Quiltjane's online store for about 3 weeks. After much thought and money juggling I reached the conclusion that I *really needed* the following items:
2x Ruby Charm Packs, Bonnie & Camille for Moda
I plan to use these to make the super easy Charm Quilt mentioned in my last post. I just love the cheery combination of blues and reds.
Buttercup Layer Cake, Fig Tree & Co for Moda
This is the layer cake that started it all. It was on sale for $25! And it was the LAST ONE. I don't know what I'll do with it yet, but I just HAD TO HAVE IT. I love this range. I also love Fig Tree & Co's Butterscotch & Roses and Strawberry Fields ranges too.
Rouenneries Deux Charm Pack, French General for Moda
I fell in love with this range after seeing someone blog about a candle mat or a table centre or something done in this range.. but for the life of me I cannot remember where it was. Does anyone know the post I'm talking about? It was a semi-tutorial (divide into light & dark tones, cut strips, cut wedges, sew into a circle, add scallops to the outer edge & fussy cut cream circle motif for centre..) Please help me!! I know a charm pack isn't big enough, but I wish I'd bookmarked the post now.
Grace Layer Cake, 3 Sisters for Moda
I love the greens, reds and roses in this range. I'm not sure if I want to do something Christmassy or just something pretty to grace (haha) my afternoon tea table.. if I can ever find that pattern (mentioned just above) I might do that with this fabric.
Good Fortune Charm Pack, Kate Spain for Moda
I nearly went with this fabric for the Charm Square Quilt instead of Ruby, but I thought that I might make myself a bag or a table runner with this instead. I love the cool colours.

But now I need to declare a moratorium on fabric purchasing for a while. No more fabric until I have completed project items with the fabric I already have (and am waiting to receive). Seriously.

Super Easy Charm Square Quilt

I was looking at charm packs online and thought I'd go hunting for a pattern that would give me an idea of what I could do with a charm pack and how many I'd need when I came across this Charm Square Quilt pattern from Snippets of a Quilter. It only takes 2 charm packs to make, and while it looks fancy and complicated is super simple! Now all I need are 2 charm packs.. what a pity, means I'll just have to buy some more fabric ;) I'm currently tossing up between Ruby, by Bonnie & Camille for Moda or Good Fortune bby Kate Spain for Moda... it's so hard to choose just one!
Charm Square Quilt from Snippets of a Quilter
It would also be easy to adapt for the Accuquilt GO! as you could cut your own "charm squares" using either the 5" square on the Value die or the Go! 5" square die.
Related Posts Plugin for WordPress, Blogger...

ShareThis

Online Quilting Class