Showing posts with label paper piecing. Show all posts

Friday, 26 October 2012

Jacky-Oh! Something Wicked This Way Comes..


I'm pleased to introduce you to my friend Jacky-Oh! He's a jack-o-lantern that has come to visit for the Something Wicked This Way Comes blog hop!


I was participating in Kristy from Quiet Play's Practically Paper Piecing blog hop when I heard that Soma from Whims & Fancies was organising a Halloween themed paper piecing blog hop. The catch? You had to design an original block. No worries... I'd just received a copy of EQ7 for my birthday from my husband, how hard could designing my own block be??

I knew straight away that I wanted to do a Jack-o-lantern block.. after all, carving pumpkins is one of our favourite Halloween traditions.


I found a free stock photo of a Jack-o-lantern, imported it into EQ7 and threw myself right in the deep end! It took a few tries, but eventually I came up with a block design worth testing:

He turned out ok, but highlighted the fact that very small lines in EQ turn out to be large lines in real life (the part where the left eye isn't actually a triangle - it's not my bad sewing, it was a design flaw!) So I went back and tweaked the pattern a few more times, adjusting his eyes and his teeth..


Alternate tooth position
 I printed out my new pattern, tested it out and voila! A delectably scary Jack-o-lantern!
 I decided that my two blocks would make fantastic snack mats for Bean and Blossom, so I backed it with some super cute jack-o-lanterny goodness (Dem Bones, Carol Eldridge for Andover Fabrics) and ditch quilted it with some Aurifil 28wt thread. I regularly use Aurifil 50wt (this was pieced with white #2024) but I'd never tried out the 28wt.. As luck would have it, I had a spool of orange #2150 from a sample pack that I won some time ago.. and it was the perfect Halloween orange! The 28wt was an absolute delight to sew with, and while it's not super obvious in the quilting (because it's quilted in the ditch), it looks amazing on the binding. I chose a decorative stitch that reminded me of candy corn, to match the candy corn fabric that I used as binding. Seriously, this snack mat is good enough to eat!

 Jacky also looks super scary when he's backlit by the setting sun. No evil spirits will be visiting here!
To be safe around the children though, we might just illuminate him with our faux candle lantern that Grandma brought home for them.

If you like Jacky-Oh! and would like to make a pumpkiny friend of your own, you can find the pattern for free at Craftsy :) There is also an "Extended Edition" available for purchase that has additional templates to create a range of different pumpkin personalities!

Saturday, 22 September 2012

Getting things done..

I pieced my July & August Craftsy BOM blocks simultaneously so that I could save time and feel like I was being really productive. I really like the effect of the traditional dresden plate (especially with the pointed ends on the inside too) but they were very fiddly due to their size. If I was making another one I'd probably have fewer wedges that were a little fatter.
July Block #1 - Traditional Dresden Plate

July Block #2 - Modern Dresden Wheel
I used the "mock needle turn applique" technique that we used for the May QCA bee blocks with the dresden wheel instead of using homespun to back the wheel in order to give the nicely turned edge. The added bonus being that I was able to use the interfacing to fuse the dresden wheel & centre circle onto the background fabric/wheel and then simply top stitch around the edges. Perfect!

August Block #1 - Ohio Star

August Block #2 - Double Star
The August blocks went together quickly and easily. I actually ended up completing them before I finished the July blocks. I love the double star block - this one turned out gorgeously light and pretty, contrasting with the equally gorgeous but darker and more mysterious block that I made for Anorina's July bee block. Definitely a block I'd use again. The Ohio star was very quick and easy to piece, and I  loved the symmetrical effect I was able to achieve with the striped fabric in the hourglass blocks.

August QCA Bee Block for McKenna
Thank goodness the Feathered Star block is finished! It is such a beautiful looking block, but gave me such a hard time! Both Phillipa and I spent a lot of time cursing during construction, and even though I "completed" the block weeks ago, it looked terrible. I had to deconstruct it, adjust it and reconstruct it... and initially I just couldn't bring myself to do all that unpicking. This week I put my action pants on though and I'm pleased to say that it is now in McKenna's hot little hands. 

My test block for the Something Wicked This Way Comes blog hop :)
I finally managed to get a design banged out in EQ7 that I thought was able to be pieced, so I printed out my foundation templates and set to testing. Overall it went together exactly the way I'd hoped, and I just have a few lines to tweak before I make the second test block (hopefully the final block!). My husband thinks I should make some with different facial expressions... which I'll just knock up in all the spare time I have..... no worries, honey! Having said that, I have a couple of ideas on how I could tweak the block a little to give me atleast one more facial expression without a major redesign.


Saturday, 25 August 2012

Practically Paper Pieced Potter and a {GIVEAWAY}!!

I've really enjoyed seeing all the amazing paper pieced projects during Kristy's Practically Paper Pieced Blog Hop... and today it's my turn to show you what I've pieced!

I decided to make a coordinating cushion to go with the Harry Potter quilt that I made for my son's birthday..

There are some great Harry Potter paper pieced patterns available from Fandom in Stitches, so although I received a copy of EQ7 for my birthday I just couldn't work out how to put my own paper pieced Harry Potter pattern together in time and went with what was already available!
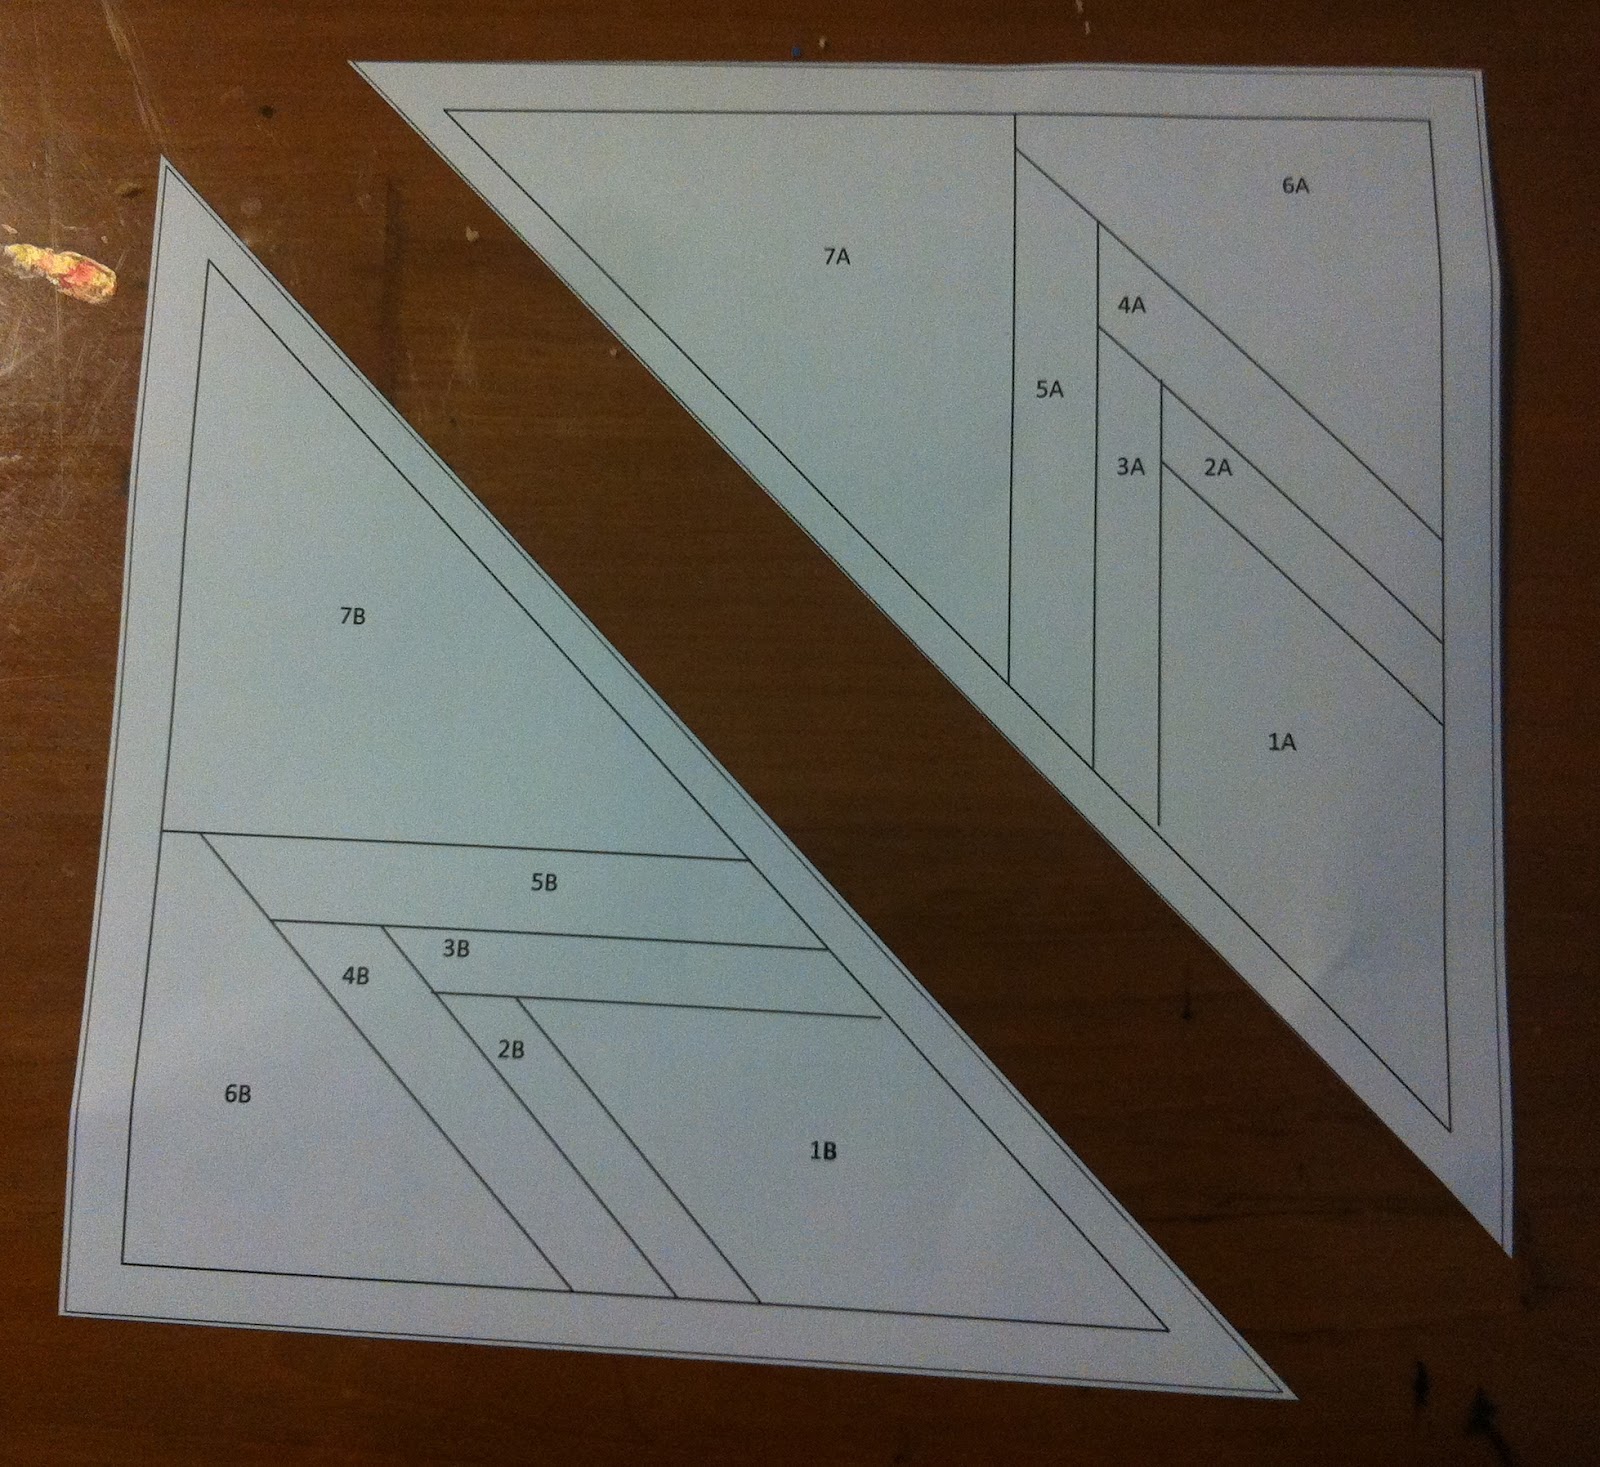
The original pattern, which I then cut in half and trimmed down so I could enlarge it.

I decided that I wanted my block to be ~10 inches though, so I had to blow up the pattern using Phillipa's fancy multifunction printer's copy function. Perfect! I also coloured in my pattern so that I could keep all the pieces straight... 
The original size versus my enlarged (coloured in) version.

My fabric choices - scraps from the Harry Potter quilt, a gorgeous black swirly fabric I bought for the August QCA Bee block, and some charm squares from one of the rainbow swaps.

... but I forgot to take into account that the pattern would end up backwards and I had to unpick and redo the blue section (because my husband was insistent that I couldn't just swap the Hogwarts crest around.. Bean would notice!).. once I'd fixed that up though it was relatively smooth sailing with only occasional unpicking required when I was being a bit too stingy with my fabric... it really does pay to be generous and then trim back - taking "short cuts" and being "thrifty" NEVER works with paper piecing!


Block complete.. So in love!

With the block complete I decided that I wanted to add an additional ~1" border in the black so that it made the crest stand out a little more. To make the cushion cover I wanted a 15" front panel, so I used 3" strips in the blue mosaic print from the Harry Potter quilt to border the Hogwarts crest (this gave me plenty of room to trim back). 

Using plain white homespun as backing fabric, I then quilted with a simple outline/ditch quilting around the "H", the crest (Aurifil 50wt #2130) and between the black & blue fabric (Aurifil 50wt #2620 - which I also used to piece.. I love this colour, it's so versatile for everything). 

I made a simple envelope backing (2 panels 15" x 10" - both lined with the white homespun for strength and one with pretty binding, incase you wanted to know) for the cushion using the blue feedsack from the Harry Potter quilt. Simple, but effective. Not to mention that it helps coordinate the cushion with the quilt!

The cushion turned out beautifully - Bean is so excited and wants to have it on his bed straight away, which kind of scuttles my plans to give it to him for Christmas! So much for planning ahead. I guess I'll just have to learn how to use EQ properly so I can make him another cushion (it looks so lonely by itself!) as a surprise. I think I'll attempt to design a Gryffindor crest of my own.. but we'll see!
The cushion and the quilt meet for the first time.
So there you have it! You could make a cushion like this with any stray paper pieced block, all you need to do is add a border to make it the finished size you want.

Oh.. I mentioned a GIVEAWAY, didn't I? It just so happens that next week is my 1 year blogiversary, AND I'm about to hit 100 followers.. all of which coincided beautifully with The Quilting Gallery's Blog Hop Party!

Blog Hop Party with Give-Aways

So to celebrate, I'm offering up an AURIFIL Thread Colour Card.
Image Source: Aurifil.com
To enter, all you have to do is leave me a comment. About anything really, but you could always tell me what kind of fan-related paper piecing you would love to try.

For bonus entries (which are entirely optional) you can:
* Follow my blog
* Follow me on Facebook or Twitter
* Tweet, Blog or share my giveaway and leave me a link.

The giveaway will be open until Tuesday, September 4th at 7pm Western Australian Standard Time. International entries are welcome.

If I manage to hit the 100 follower mark, I might even throw another giveaway on my actual blogiversary date :)

Meanwhile, back to the Practically Paper Piecing Blog Hop.. don't forget to check out the other projects still to come:

27th August - Fiona from Celtic Thistle Stitches
28th August - Anorina from Samelia’s Mum

And you can find the list of the other blog hop stops at Kristy's PPP page :)

Wednesday, 15 August 2012

Playing catch up..

Please don't confuse my lack of blogging for lack of activity... I'm pleased to say that we are settled in the new house (although there are still a few boxes haunting me) and the other house if FINALLY not my problem.. it's sold, settled and its new owners have moved in. Thank goodness. There were a few moments during the final moving/cleaning stage that were rather fraught with emotion/exhaustion. Have I mentioned that I hate moving house?

And my new house is unpacked enough that I have been able to sneak a few hours in my sewing room (my husband still thinks unpacking should be my first priority, followed by cleaning... but a girl needs to have some fun!)..

I don't think I ever revealed what I'd received in the QCA Handmade Swap. The lovely Jess from Scrappy n Happy sent me the most gorgeous little sewing kit, complete with embroidery scissors, applique needles & thread. She also enclosed some chocolate (I LOVE the Cadbury Marvellous Creations - it's fully of popping candy fun!) and fancy coffee sticks so I could sit down and check my gift out properly. The sewing kit has a matching needle book - both using a print from Bonnie & Camille's Ruby line.. one of my favourites! I especially love the measuring "tape" on the front. Jess, you'll be pleased to know that I could not live without those embroidery scissors!


All kitted out! Aren't I a lucky girl?
Speaking of swaps, I posted off my #talknt Handmade Swap gift.. and it made its way to Utah to live with @catann40. I made a mini quilt using a Swoon block, and this time I remembered to add hanging tabs! I really liked the way the mini turned out - it was incredibly hard to send it away.. good thing I've got lots more of that fabric! (I've actually decided to turn "my" Swoon quilt into a quilt for my Granddad... hopefully I can get that finished in time for Christmas!)


A closeup of my stippled quilting


I am dreadfully behind on my Craftsy BOM blocks.. I haven't done the July blocks yet, but if it makes any difference I used the tutorial for one of the August blocks to make Anorina's July QCA Bee block (which I made last week. In August. Woeful.). Anorina asked for a 12.5" star block of our choice, in grey/black/white/orange. I found some gorgeous black swirly and "galaxy" print fabric at Textile Traders, and used some orange from my stash. Bean really liked the block, he thought it looked like a Harry Potter star (whatever that is!).


I also made a start on McKenna's August block today. McKenna asked for a 16" feathered star block in the patriotic red, white & blue. So far I'm about halfway through cutting 48 1.5" HSTs.


I also finished piecing the nine patches for the quilt my husband wants me to make for a friend of his.. 64x 6.5" nine patches! Next I get to cut 64x 6.5" squares from my white background fabric so that I can turn all those nine patches into 128 nine patch HSTs. This quilt pattern is somewhat more labour intensive than the last two patterns I made out of Pam & Nicky Lintott's Layer Cake, Jelly Roll & Charm Quilts. I think it will look really effective once it's done though.

6 down, 58 to go...

64 nine patches complete!
 And the last thing I've been working on is my project for the Practically Paper Piecing blog hop that Kristy from Quiet Play is hosting. I've actually finished my paper pieced block, and all I have to do now is turn it into a finished product. You'll just have to wait until next week to find out what it is!

 Practically Paper Piecing

Here's a sneak peek for you...
Linking up to:
  WIP Wednesday at Freshly Pieced

Saturday, 2 June 2012

Lone Starburst Paper Pieced Block Tutorial (for QCA Bee #2)

As requested, here's a tutorial for the Lone Starburst paper pieced block (for templates used see The Quilting Climber). Please note that this post is VERY pic heavy!

Print off 4x templates as shown. Make sure that your  1" square test block is 1" square! Phillipa and I found her printer needed to be set on US letter to print correctly, A4 came out smaller!

Cut out your templates. There will be an A & B piece.

Repeat for all sheets, until you have a total of 8 sections (4x A, 4x B). I trimmed mine with a little extra margin so I could trim them down after I made the blocks.

Choose your fabric colour scheme

 I found it more efficient to pre cut my pieces so that I could semi chain piece my blocks. You can do it however you want! I measured and cut my diamond shapes from an approx 3" strip, with diamonds ~5" "long". Make sure that all of section 1A/1B is covered, I also covered sections 2 & 3 (for seam allowance).

 I used white for the middle strip, and two aqua prints for the outer strip - for both of these I cut approx 1.5" strips and then subcut into pieces approx 4" (white) & 5" (aqua) long. Make sure that the strips comfortably cover their section, keeping in mind that when they are folded & pressed they will angle in the opposite direction. If you don't cover their section with room to spare you will find yourself spending a LOT of time frogging seams. Trust me, I know.. Btw, you will need 8x diamonds but 16x strips in each colour.
Set your stitch length to 1.5 to make it easier to remove the paper later.
 Ok, now we finally get to the sewing!
To align your fabric for sewing, hold your template up to the light and place the diamond so it completely covers section 1A/B. Do this on the opposite side to the printed text as you will need to see the text/lines to know where to sew! The diamond should be "right side up" (wrong side touching the paper).

Line up one of your strips (in my case, white) along the edge of the diamond, or so that it covers the 2A/2B line. The strip should be "right sides together".
 
 Start from the intersecting point (where 2A/2B meets 3A/3B) and sew until you reach the end of the template (even though the line isn't marked into the seam allowance).
Fold template back along the stitch line and trim to 1/4" seam allowance to reduce bulk.

Press open.
 
Place the 3A/3B strip in place.

Sew along the 3A/3B line, trim and press open.

Repeat for 4A/4B

and 5A/5B


 For my background fabric I cut 8x 5" squares, and then subcut into HSTs. You could cut smaller/more accurately sized pieces if you like, I was just avoiding more frogged seams! If using HSTs, align as shown above, and then sew along line 6A/6B.
Trim seam allowance to 1/4" and press open.

Align final piece..

Sew along 7A/7B, then trim to 1/4" seam allowance..

and press.

Trim excess fabric using acrylic ruler and rotary cutter.

You should have on beautifully sharp, perfect section!

Part A & B complete

Repeat for all 8 pieces/4 sections

 Take an A section and a B section. Align the seams, trying to match the strips as closely as possible. Pin as required. I left my paper in until the block was complete so that I didn't stretch/distort the block, but this is personal preference.

Sew along diagonal seam allowance marking

Press seam open

I then carefully removed a section of the paper where the 4 sections will meet - this was because when I did my first blocks it was very hard to remove the paper once all 4 sections were joined.

Repeat for the other 3 sections

Pin two sections together, matching strips as before.

Sew along seam allowance line.

Press open

Repeat for the other half

Pin both sections at the centre seam and matching the other strips as closely as possible.

Sew along seam allowance line, press seams open. 
Yay! Your block is complete! Mine measured approx 11.75" at this point, but once the paper was removed it ended up around 12.25". If your block is approx 12", it's good enough for me! Now you can either grab a drink, pop the TV on and indulge in the therapeutic properties of removing all the paper, or you can post it with the paper still attached and I'll do it later :)

My 3 test blocks :)

Related Posts Plugin for WordPress, Blogger...

ShareThis

Online Quilting Class