Sunday, 8 April 2012

Easter crafts

We got notice last Friday afternoon that the kids were having an Easter Hat Parade on Tuesday morning. For most of us, this was our first foray into Easter Hat making as the kids made their hats in class last year. Happily for me, I was on my way down to Spotlight anyway (armed with the $10 VIP vouchers they had going) and discovered that all their Easter stuff had been marked down by 50%. Sweet! Even better, they had lots of Easter DIY activities, including an Easter Bonnet kit.


 For my $10 I came home armed with Easter basket kits, foam mask kits, an Easter bonnet kit and a pile of decorative eggs & chicks. Of course, because Blossom didn't get to make an Easter hat we had to start with something she could join in on - the Easter baskets! The kits came complete with sequins in heart, star, leaf & regular sequin shapes, so everyone got a chance to decorate to their heart's content. And we still have sequins left over!

From the side

And don't forget the back!
 With Blossom all sequined out, Bean and I were free to continue on with the Easter hat. It came with a foam bunny design that Bean put together on his own (including drawing the mouth with permanent marker) and a couple of adhesive foam eggs and a pink pompom tail. I'd also bought some funny faced eggs that Bean stuck onto his hat with a little sticky tape. Not fancy, no hot glue, but Bean LOVED it. He was so proud when I dropped him off at school on the Tuesday, and one of the other mum's took photos during the Easter Hat Parade, and he just looked so happy! (Meanwhile, I was on roster in Kindy with Blossom, so I couldn't be there to watch.)

Bean's self-decorated Easter Hat

And the back with the pink fluffy tail!
 On the Saturday that Mum and I bought Daisy the embroidery machine we again raided the 50% off Easter stuff and came home with some paint & decorate polystyrene eggs. The kids did this activity with Mum while the husband and I opened Daisy's box and checked her out.
Through the week we also made up some of our other crafty things, like the foam masks and some foam easter egg stickers, which we stuck to the glass sliding doors in the kitchen just to make it a little more festive.

I've also got a couple of other things up my sleeve that we might pull out today.. especially seeing as our Easter lunch plans were canned yesterday afternoon as a result of both kids getting a virus through the week and fears that we might pass it on to my little nephew.

So we've mostly eaten chocolate and hot cross buns today (ok, only my husband and I ate the hot cross buns, the kids are operating in sugar-only mode) and I'm psyching myself up to head down to the only open Spotlight near me as a consolation.. might as well get some 40% off fabric/batting instead of gorging myself, right!?

Saturday, 7 April 2012

Aurifil Designer Collection Competition

 Lily's Quilts is hosting a competition a la Quokka Quilts (Laura) & I'm a Ginger Monkey (Katy) - except this time instead of fabric bundles, you get to design your own dream Aurifil thread collection. Can anyone say awesome??

I currently have 5 collections planned, mostly for projects I have in the pipeline (because really, if you're going to win thread wouldn't it be great if it was for a project?).. So far I've only put two of my collections together, so without further ado let me introduce you to:

 "Hopping to California"

Inspired by Figtree & Co's "California Girl" range, this collection (should I win!) was designed to be used with my "California Girl" jelly roll that is earmarked to make Camille Roskelley's "Hopscotch" quilt pattern as part of Katy's "Swooning-on-a-hop-along".


Threads used are designed to be in a 40wt, perfect for piecing and quilting.

Top Row:
1. 2130, 2. 1135, 3. 1231, 4. 1147

Middle Row:
1. 2021, 2. 4668, 3. 2220, 4. 2250

Bottom Row:
1. 5007, 2. 5006, 3. 1320, 4. 2325


"Divine Sweetness" 

My second collection is inspired by The Quilted Fish's "Sweet Divinity" range. I have purchased most of the prints in this range (and her "Sugar & Spice" range) so that when we finally move house I can do up Blossom's room.. new quilt, bunting, cushions, you name it! I really wanted something that wasn't just pink, because little girls grow up eventually and I wanted something that would see her through quite a few more years!


Again, the threads I've chosen would be a 40wt, perfect for piecing, quilting and perhaps even a little applique, embellishment or machine embroidery!

Top Row:
1. 2024, 2. 3770, 3. 2805, 4. 2815

Middle Row:
1. 2105, 2. 2135, 3. 4653, 4. 2888

Bottom Row:
1. 4660, 2. 3660, 3. 2588, 4. 4020

Thursday, 5 April 2012

Harry Potter quilt update

It's been ages since I've written an update on the Harry Potter quilt, and that's mostly because once I realised I wasn't going to have it ready before Christmas and it would become Bean's birthday present I just sat on it... because I had *time*... like a whole 6 months... except time has gotten away from me and now I have just less than a month. I can't disappoint my son by not having it ready in time for his birthday - he's been asking when he's getting his Harry Potter quilt and it makes me feel so guilty!

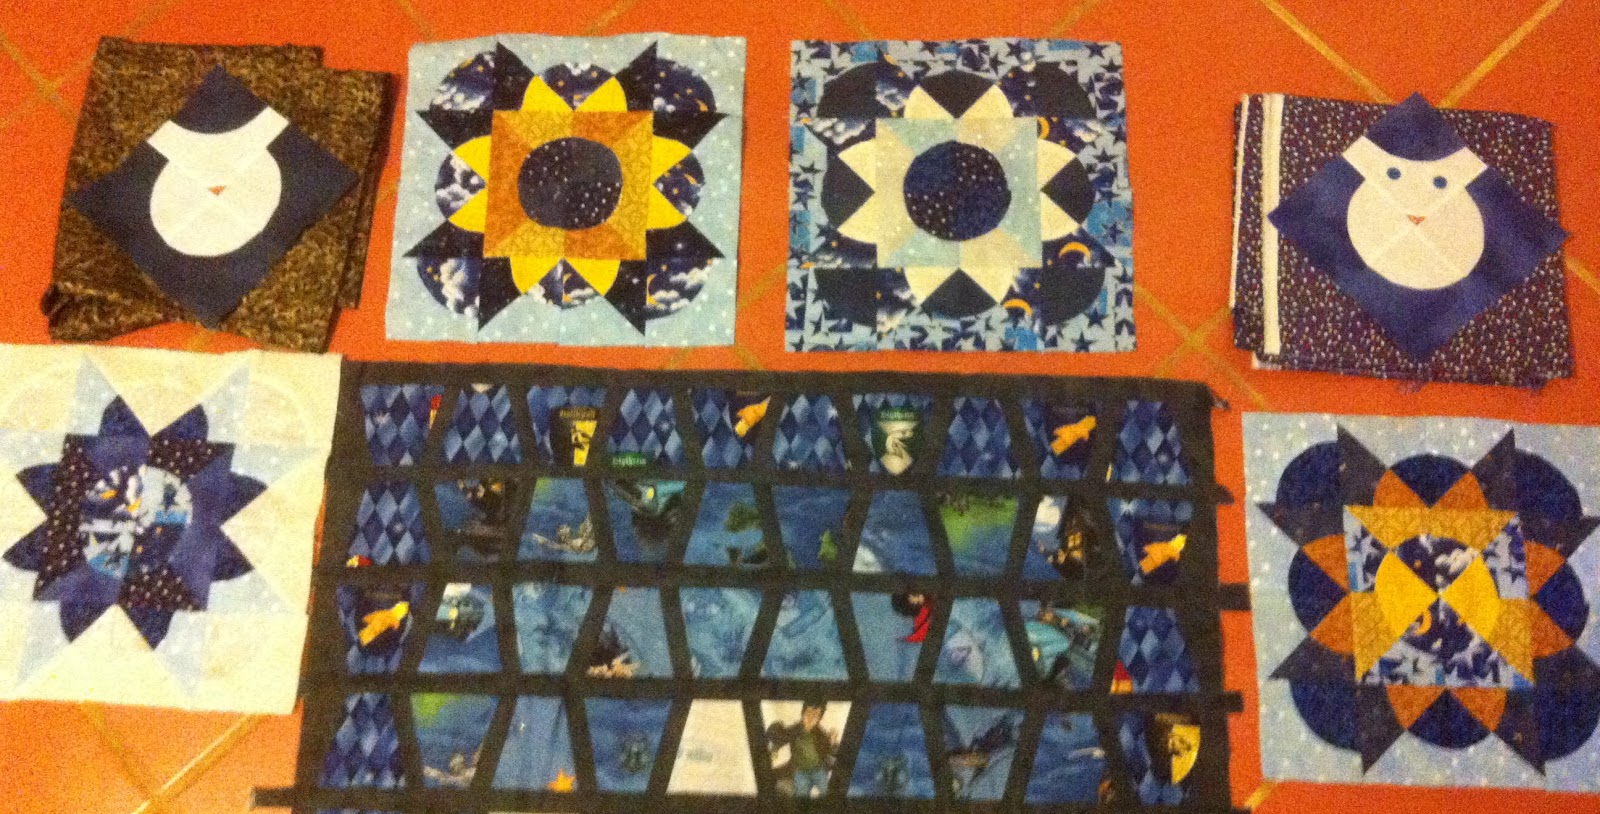
But over the last 2 weeks I've been on a roll - I completed the rest of the Split Drunkard's Path Star blocks, and laid it out so I could get an idea of how all my pieces looked together:
All my blocks, roughly placed.
 Next step: Making the owl blocks the same size as the star blocks. This shouldn't be too hard, right? It's just a case of cutting some triangles and sewing them on...
Auditioning 2 different fabrics as potential backgrounds for my owl blocks.
 I went with some blue "feedsack" (repro, of course!) fabric I'd bought at Spotlight, drew a scale drawing of my block and the "finished size" block and then used my ruler to work out how big my HSTs needed to be in order to make my block the right size. Luckily for me, it went together pretty smoothly. (Clearly my quilt math was ok!)
My larger owl block (unpressed)

Blocks laid out again with the larger owls
The next day I worked out how I was going to sash the stars to make them fit and have now turned them into strips of stars (but I forgot to take a photo) and I went and purchased a complimentary fabric that will go at the top and the bottom of the quilt top to make it longer. I think the width will be fine once it's all sashed and put together properly.

I haven't had a chance to touch it since last Thursday/Friday though as my husband and I have spent most of our spare time playing with Daisy, my new embroidery machine. (He is playing with another design he's digitized as we speak! I am sure he's getting WAY more out of this toy than I am! Oh, and my sister-in-law had her baby, so we've been visiting my new nephew!) Hopefully I'll get a chance to go to Phillipa's in the morning for our regular Thursday sewing morning and work on it some more then. Only 25 more days until it needs to be finished!

Meet my new Brother!

I have the best Mum on the whole wide world! Seriously.

Spotlight had another one of their $10 VIP coupon promotions running last week, so Mum and I caught up for coffee and a chat followed by a trip to Spotlight.. Because really, who wouldn't want to hang out with their mum at a fabric store?

As a bonus, all their Easter stuff was 50% off so we bribed the kids by letting them go crazy with Easter decorations and craft projects! Smart, yes?

So while we were wandering around looking at the "boring fabric stuff" I noticed an embroidery machine on their clearance table. A closer inspection found it to be a Brother Innovis 750d embroidery machine. A quick google on my phone revealed that it had a retail price of around $1100ish and some excellent reviews. Did I mention it's also the Disney model? Strictly for personal use of course, but that's fine - there are plenty of small children in my life that have birthdays and Christmases coming ;)

Source: Brother.com

The best part is that the clearance price was $299! Too good to pass up, and my Mum agreed.. she offered to purchase it for me! A quick phone call to my husband (so he could confirm that it was a machine "worth" buying - which he did) and we were on our way to the checkout. The husband had confirmed that aside from the memory cards that can be purchased it was all good to go as far as purchasing online digitised embroidery designs and making up our own designs and loading them on. Woo!
My 2 day stash ;)

The not best part was that we were so exhausted by the time we'd decided to buy the machine that Mum and I didn't think about buying embroidery threads & stabiliser, so we had to wait 2 days until  Monday so that we could finally fire it up and try it out! Although on the up side, my husband is SO excited about this machine (so much so that you'd think it was *his* new toy!!) that he even came to Spotlight with me to buy thread and stabiliser which means that I have rather an "impressive stash" for someone who has owned her machine for less than a week. He's also purchased Embird Embroidery Software with all the extras (because have I ever mentioned that he's a Software Engineer  and loves all things software related?) and has spent the last 3 days digitising designs for the kids. I think he knows more about my new machine than I do!

*My* first attempt, using one of the inbuilt designs.

Our second embroidery design, purchased from Designs by Juju

2x finished muslin bunny rugs for my brand new nephew (name blurred)
Designs both from Designs by Juju
Infact he's declared that everyone we know will now be receiving embroidered gifts for the rest of forever. Sooooo amused. Meanwhile, I haven't had any time to quilt because I've been too busy "helping" him play with "his" new machine! But I need to get cracking on the quilting because I'm SO close to finishing the Harry Potter quilt top and it needs to be quilted, bound and finished by the 1st May  (Bean's birthday)... although now I'm sure the quilt label will be a little fancier!

The husband's first digitised design (of a certain pig Blossom requested, who shall remain nameless)

Attempt #1 - about 6 attempts later, we've ironed out the kinks in the dress!
I wanted to give my new machine a name (I was thinking Daisy) but my husband has "forbidden" it - he thinks it's silly. I pointed out that all his computers have names (server names), to which he replied that once it could be logged onto over the internet, then I could name it. But we don't have to tell him that I named it anyway, right?

Daisy might seem like a weird name to give a *Brother*.. but it's kind of appropriate.. when Blossom was littler the way she pronounced her brother's name came out sounding like "Daisy", so Daisy it is!

Thursday, 29 March 2012

Blog Hop Linky Party


Now that Google Friend Connect isn't available for non-Blogger blogs, there are a few other widgets floating around so that people can stay linked up.. Linky Followers is a relatively new one - rumor has it that it's only been around for 2 months or so!

Anyway, It's So Very Cheri has decided to host a blog hop linky party (try saying that 5 times fast!) to help people re-connect with their favourite blogs, or discover some new favourites - yay! And just when you thought you'd caught up on all your blog reading :)

So I decided to join the party, and you can too!


RULES:

1. You MUST have the LINKY FOLLOWERS tool on your site to participate.

If you see that your link has been deleted you need to add the LINKY FOLLOWER tool to your site and then come back over and re-enter your link
{You can have both the LINKY FOLLOWERS & GFC on your site but you must have the LINKY FOLLOWERS tool to participate in this party hop.}

2. You MUST follow the person who has the party on their site as a thank you.

3. Just add your blog button to the LINKY PARTY below.

4.Then grab the BLOG HOP code

You will find the code right under the Linky Party where it says CLICK HERE TO ENTER–
just under that it says: WHAT IS A BLOG HOP? GET THE CODE HERE
Click on GET THE CODE HERE and enter it into a post on your site.
You can grab the party button code in the FOOTER at Its So Very Cheri
You can grab info from my post if it helps you with your post.

5. Then you follow other bloggers–(as many as you want)
–leave each one of the blogs that you follow a comment letting them know you are following them and ask them to follow you back.

If you want to add the BLOG HOP to your own site you will get lots of new followers–(see rule #2)

Wednesday, 28 March 2012

Building blocks..

So after a very productive start of last week I got all caught up in the crazy non-sewing stuff that was pencilled onto my calendar... On Saturday I hosted a Baby Shower for my sister-in-law which was a lot of fun :) She loved her quilt, and all the other pregnant women oohhed and ahhed appreciatively! The "long-legged monkey" is still happily ensconced, but we're all thinking that it's just a matter of days until he or she makes her dramatic entrance... not long to go now! (She just txted me to say she didn't feel like going to baby yoga this afternoon, so I think it might be go time real soon now!)

8 completed Split Drunkard's Path star blocks
Over the last week I've managed to complete the final 8 Split Drunkard's Path Star blocks for Bean's Harry Potter quilt, so now I can lay out the pieces that will form the quilt top and hopefully work out how to put all the elements together with relatively little trouble. (Hah!) I still need to make the owl blocks bigger so that they are the same size as the stars, and then I need to work out how much sashing/bordering is required to make the star border fit around the sashed tumbler centre section. And then, I need to work out what I'll still need to do to get it closer to single bed sized. How I wish I had a copy of EQ7!!!!
I also completed my second March Craftsy BOM block, the "Broken Spiderweb". I love this block! I've seen it floating around the blogosphere, and I just think it looks amazing. Blossom asked me if she could have this block, so perhaps when I get Bean's quilt finished and can start on hers I'll have to incorporate the broken spiderweb block into her quilt design! (I have all her fabric - a combination of Sweet Divinity and Sugar & Spice by The Quilted Fish for Riley Blake.. just no specific design in mind yet) Can you tell I love the Quilted Fish? (My Craftsy BOM is using an FQ bundle of Delighted!)

Anyway, enough blogging, time for more sewing!

Linking up with:


Fresh Poppy Design WIP Wednesday at Freshly Pieced WIPs on Wednesdays

Wednesday, 21 March 2012

On a Roll!

Following on from yesterday's productivity, I finished Belinda & Linda's Good Fortune mug rugs this morning..
Belinda's


Linda's


Top side

Reverse side
I still have mine to make, and I was planning to make it exactly the same.. but I had an extra 9 patch block and I hate seeing things got to waste... so instead I used the extra pieces to square my blocks up.. I think I'll put a thin border of white homespun around it before I quilt and bind it.. it'll end up being a little bigger than the other mug rugs, so I guess it could always double as a candle mat!


 Next I pulled out the Drunkard's Path blocks that I'd split and pressed (enough for 3x star blocks), squared them up to 3.5" and laid them out. Unfortunately one of my blocks doesn't quite work for me (colour combination-wise) so I set it aside because I might be able to switch around some of my other blocks and retrieve the situation. But I finished one piecing one block (I couldn't be bothered going outside to the ironing board in the dark, which is why it's not pressed) and I've nearly finished the other (see note re: pressing)...
One block complete (needs final pressing)
  I *did* work out how to do that cool web string chaining thing though, so that my block actually stays looking like that even if I pick it up, and once I've pressed it all I'll need to do is just zip down those rows and it will be done!
Second block nearly complete 
 Linking up with:


Fresh Poppy Design
Related Posts Plugin for WordPress, Blogger...

ShareThis

Online Quilting Class