Saturday, 2 June 2012

Lone Starburst Paper Pieced Block Tutorial (for QCA Bee #2)

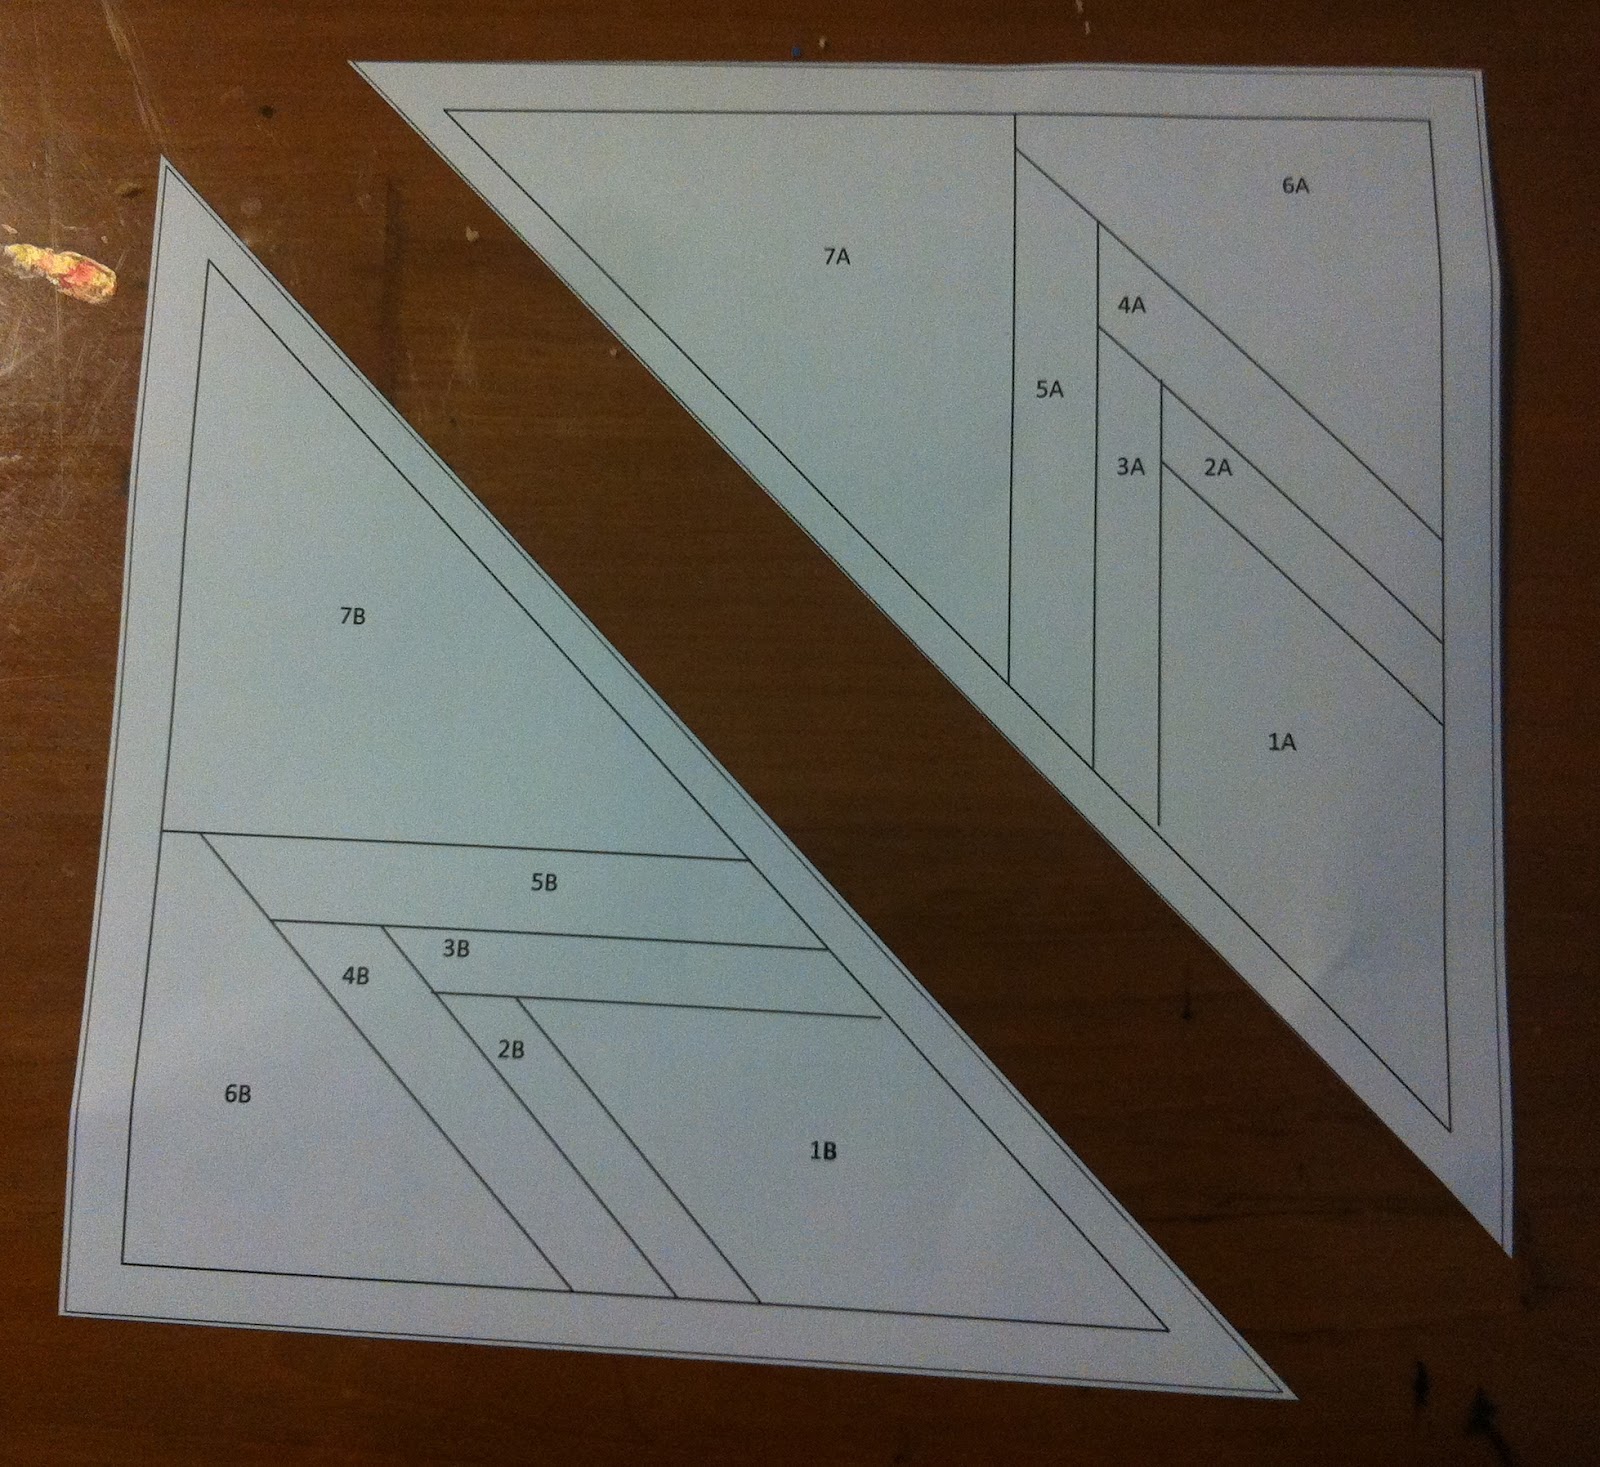
As requested, here's a tutorial for the Lone Starburst paper pieced block (for templates used see The Quilting Climber). Please note that this post is VERY pic heavy!

Print off 4x templates as shown. Make sure that your  1" square test block is 1" square! Phillipa and I found her printer needed to be set on US letter to print correctly, A4 came out smaller!

Cut out your templates. There will be an A & B piece.

Repeat for all sheets, until you have a total of 8 sections (4x A, 4x B). I trimmed mine with a little extra margin so I could trim them down after I made the blocks.

Choose your fabric colour scheme

 I found it more efficient to pre cut my pieces so that I could semi chain piece my blocks. You can do it however you want! I measured and cut my diamond shapes from an approx 3" strip, with diamonds ~5" "long". Make sure that all of section 1A/1B is covered, I also covered sections 2 & 3 (for seam allowance).

 I used white for the middle strip, and two aqua prints for the outer strip - for both of these I cut approx 1.5" strips and then subcut into pieces approx 4" (white) & 5" (aqua) long. Make sure that the strips comfortably cover their section, keeping in mind that when they are folded & pressed they will angle in the opposite direction. If you don't cover their section with room to spare you will find yourself spending a LOT of time frogging seams. Trust me, I know.. Btw, you will need 8x diamonds but 16x strips in each colour.
Set your stitch length to 1.5 to make it easier to remove the paper later.
 Ok, now we finally get to the sewing!
To align your fabric for sewing, hold your template up to the light and place the diamond so it completely covers section 1A/B. Do this on the opposite side to the printed text as you will need to see the text/lines to know where to sew! The diamond should be "right side up" (wrong side touching the paper).

Line up one of your strips (in my case, white) along the edge of the diamond, or so that it covers the 2A/2B line. The strip should be "right sides together".
 
 Start from the intersecting point (where 2A/2B meets 3A/3B) and sew until you reach the end of the template (even though the line isn't marked into the seam allowance).
Fold template back along the stitch line and trim to 1/4" seam allowance to reduce bulk.

Press open.
 
Place the 3A/3B strip in place.

Sew along the 3A/3B line, trim and press open.

Repeat for 4A/4B

and 5A/5B


 For my background fabric I cut 8x 5" squares, and then subcut into HSTs. You could cut smaller/more accurately sized pieces if you like, I was just avoiding more frogged seams! If using HSTs, align as shown above, and then sew along line 6A/6B.
Trim seam allowance to 1/4" and press open.

Align final piece..

Sew along 7A/7B, then trim to 1/4" seam allowance..

and press.

Trim excess fabric using acrylic ruler and rotary cutter.

You should have on beautifully sharp, perfect section!

Part A & B complete

Repeat for all 8 pieces/4 sections

 Take an A section and a B section. Align the seams, trying to match the strips as closely as possible. Pin as required. I left my paper in until the block was complete so that I didn't stretch/distort the block, but this is personal preference.

Sew along diagonal seam allowance marking

Press seam open

I then carefully removed a section of the paper where the 4 sections will meet - this was because when I did my first blocks it was very hard to remove the paper once all 4 sections were joined.

Repeat for the other 3 sections

Pin two sections together, matching strips as before.

Sew along seam allowance line.

Press open

Repeat for the other half

Pin both sections at the centre seam and matching the other strips as closely as possible.

Sew along seam allowance line, press seams open. 
Yay! Your block is complete! Mine measured approx 11.75" at this point, but once the paper was removed it ended up around 12.25". If your block is approx 12", it's good enough for me! Now you can either grab a drink, pop the TV on and indulge in the therapeutic properties of removing all the paper, or you can post it with the paper still attached and I'll do it later :)

My 3 test blocks :)

Wednesday, 30 May 2012

More bee blocks


 Jane (March Bee Leader) was one Dresden short for her quilt, and I was already planning to post her a little something because she's always doing lovely things for people, and her customer service is above and beyond.. so it made sense to quickly whip her up another Dresden to add to my package. While the overall construction time was low, it took me over a week because we've had a couple of full-on weeks on the home front (and with moving time looming closer, could be a few more crazy weeks in the pipeline!). I am pleased to say that I was finally able to post Jane her package today, and with luck she should receive it by Friday! I hope she likes her surprise :)

Mock needleturn hearts
Today Phillipa and I caught up for a well deserved sewing day.. the last few weeks have seen Belinda, Phillipa and I having to constantly reschedule! I made Phillipa's other bee block last month when she was testing it out, but when McKenna joined our bee hive earlier this month and we had to cut another set of pieces I figured that I might as well cut enough so I could do the "easy" block too.

I really enjoyed the needleturn applique - I can definitely see myself using it for other projects, including customised tshirts/skirts for Blossom. But I'm all for lazy short cuts that make my life easier!

My finished block

A close up of my clover leaf
 I laid out all Phillipa's blocks (ok, so she only had our 4 plus one from Sue - the rest are still in transit or under construction) and I think they are going to look lovely once they're all laid out together.. I love the way the flower blocks form a lattice, and the clover leaves link in too... there's so much movement :) I could see myself thefting the flower block and using it again for a little girl/baby quilt, or as part of a larger applique design.

I started on my May Craftsy BOM blocks, but as you can see I didn't get very far! This one is supposed to be the framed wonky log cabin. Unfortunately I ran out of time to sew, and had to go do the school pick up instead!

Linking up with WIP Wednesday on Freshly Pieced:

WIP Wednesday at Freshly Pieced

June QCA Bee (Hive #2) Blocks

Only a couple of days left until June, which is the month that I'm Bee Leader for the Quilt Club Australia Hive #2 Bee... must be about time for me to let the girls know what I'm looking for!


When I first joined the QCA bee I went hunting online for bee blocks. I found the Quilting Bee flickr group and browsed through to get an idea of the kind of blocks people were likely to be asking for, or that would be appropriate to use when my month came around.

The block that caught my eye was the Lone Starburst block, made famous by Six White Horses (well, I don't know where it started, but that's where I ended up!). She has some gorgeous examples on her blog, and the possibilities are just endless! (The template for the block I want is the one from The Quilting Climber, which can be found here.)

Source: Six White Horses

But straight away I knew I wanted to see it in a turquoise/aqua/blue colour scheme - this block is *perfect* for my sister. She's not a traditional girly girl, and she has always loved shades of blue & green. So all the blocks will be assembled into a quilt for my sister, who is the best sister in the world as far as I'm concerned!

This was my original colour palette (which is still 100% perfect)
I went down to Spotlight to pick up a couple of FQs so I could do up my sample block and decided it would look awesome with the darker grey as the background - I took my Kona colour card with me, and I matched up the Prima homespuns.. The dark grey is Prima Iron, but is similar to Kona Coal. I also picked out the Prima Light Grey (similar to Kona Ash) because I thought it was a possible alternative.

When I got home, I'd received a parcel of Good Fortune scraps direct from Kate Spain herself (she's such a sweetheart!) which were kind of like the muted version of my colour scheme:


My alternate colour palette (featuring Good Fortune & Fandango)
I added in some Fandango that was the perfect shade of aqua, and this is what happened...

The picture doesn't do it justice.. all I can say is *LOVE*!
I was so careful: sew, press, cut, sew.. and it turned out perfectly. With my success under my belt I decided to be efficient and pre cut my strips etc... but I ended up being a little crowded in my workspace and a little complacent.. finger pressing instead of pressing etc. A LOT more frogging. And at the end of the block, my "efficiency" showed... my seams are all about 1/8" out, my centre seam looks like a dog's breakfast... Fortunately, from a distance you can hardly tell. But let this be a warning - short cuts aren't always quicker!!!!!

Can you see my sloppy sewing?
Anyway, they both turned out satisfactorily over all, and I'm really happy with my colour choices!

To summarise:

Block: Lone Starburst, templates here
Background colour: Grey.. Prima Iron or Light Grey, Kona Coal or Ash or similar from other brands!
Starburst colour: Blue/Turquoise/Aqua etc

Any questions, let me know!

Thursday, 10 May 2012

And the winners are....

Sorry for the delay on the post, folks.. it was perhaps a little short sighted of me to plan to draw the giveaway on a night when I had to drop the kids at mum's because I had back to back markets over the weekend!

So without further ado, I am pleased to announce the two winners of the Riley Blake fat quarters:


Firstly, Fiona from Finding Fifth, a fellow Aussie & QCA member.


And also Gill, who hails from the UK.

I have emailed both winners and look forward to posting out their goodies soon!

Thanks to everyone who entered - stay tuned for another giveaway once I reach the 100 follower milestone! (Only 12 followers to go!)

Related Posts Plugin for WordPress, Blogger...

ShareThis

Online Quilting Class